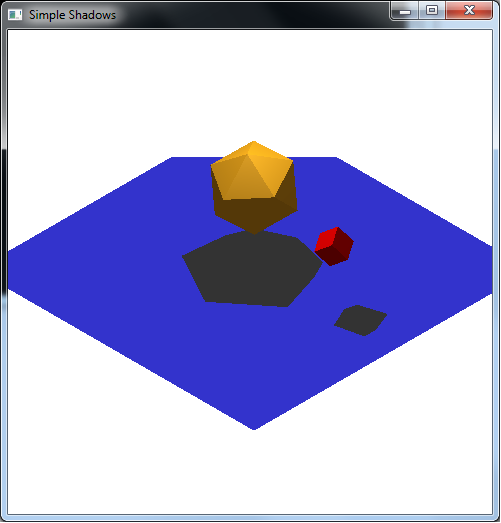
So far our light sources have provided illumination and highlights to the objects in the scene. For additional lighting effect, we would like the light sources to cast shadows (further enhancing the user perception of the light position). Since the pipeline does not allow for global effects directly, producing shadows is a multipass technique, i.e. we must render the scene twice. Shadow mapping involves creating a shadow projection matrix which will essentially render all the objects (in the second pass) onto a surface based on the position of the light source. By setting the color for the projected objects to a shade of grey, the shadows will appear to have been created by the objects.
0. Getting Started
Download CS370_Lab15.zip, saving it into the labs directory.
Double-click on CS370_Lab15.zip and extract the contents of the archive into a subdirectory called CS370_Lab15
Navigate into the CS370_Lab15 directory and double-click on CS370_Lab15.sln (the file with the little Visual Studio icon with the 12 on it).
If the source file is not already open in the main window, open the source file by expanding the Source Files item in the Solution Explorer window and double-clicking simpleShadow.cpp.
1. The Shadow Matrix
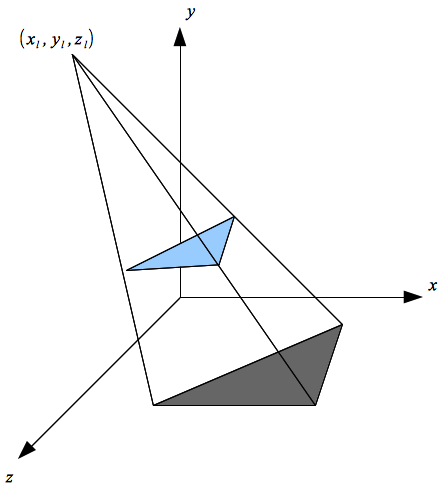
For the creation of basic shadows, we will assume that the light source is at a position (xL, yL, zL) and that the shadow is being cast on the x-z plane (i.e. y=0). This would be similar to the shadows created on the ground by the sun. Hence we will extend projector rays from the light source through the objects and determine where these rays intersect the x-z plane (see figure below)
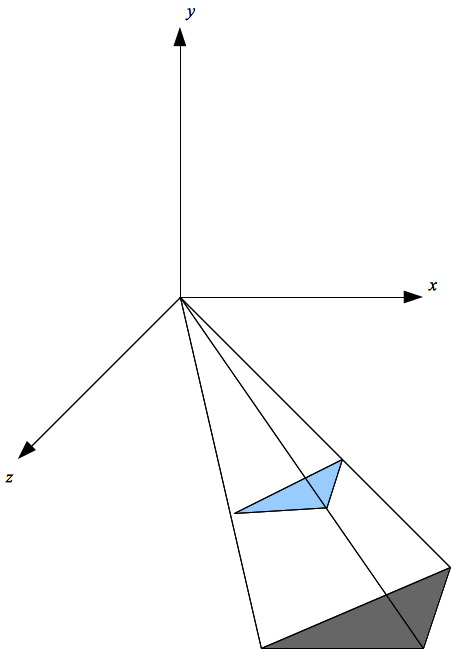
thus creating a shadow polygon for each object. If we translate the light source to the origin,
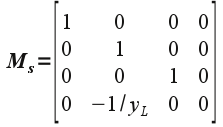
the shadow matrix will be given by
In OpenGL, (unfortunately) matrices are stored in 1D arrays that are column-major, i.e. the indices go down the columns.
Tasks
- Add code to main( ) to initialize all the values of the shadow matrix as shown above. Hint: It may be easier to write a small loop to initialize all the values to zero and then individually change the non-zero entries. Be careful with the indicies, remember they go down the columns.
2. Rendering the Shadows
To render the shadows using the shadow matrix, we will need to perform three steps to create the appropriate model-view matrix:
- translate the light source to the origin
- apply the shadow matrix and render the scene (second pass)
- translate the light source back to its original position thus positioning the shadow polygons on the x-z plane
We already know how to perform translations using glTranslatef(). If we have a(ny) matrix stored in a 16 element 1D-array which is column-major, we can multiply this matrix into the current matrix (either projection or model-view) using:
glMultMatrixf(m);
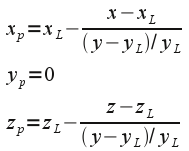
where m is the array for the matrix. Therefore, after applying this matrix along with the translations, a point (x,y,z) will be transformed to
which is the projection for any point onto the x-z plane.
By selecting an appropriate grey color, rendering the scene with this model-view transformation will produce "flat" shadow polygons on the x-z plane. Since we are rendering the same objects, just with a different transformation, we can simply add a shadow flag to our render_scene( ) which selects the appropriate color to draw the object with.
Tasks
- Add code to render_scene( ) to render a GLUT (solid) icosohedron and cube using the brass and red_plastic materials when the shadow flag is false.
- Add code to render_scene( ) to apply appropriate local transformations for each object, i.e. translations and rotations, based on their corresponding global variables. NOTE: The local transformations need to be applied to both the normal object and the shadow object so should be placed before rendering either version.
- Add code to display( ) to translate the scene by -light0_pos[ ], multiply the shadow matrix into the model-view matrix, and translate back by light0_pos[ ]. NOTE: Don't forget the proper order - transformations that are applied first are programmed last.
- Add code to render_scene( ) to change the color to shadow_color[ ] and draw the two solid objects (without edges) when the shadow flag is true. NOTE: Since lighting is being used, we need to use the default shader program to render the shadows.
- Add code to display( ) to render the shadow polygons by calling render_scene( ) passing true as the argument.
WASD will move the light in the x/z directions. Note how the shadows change as the light is moved (since yl remains constant the shadow matrix does not change). The left and right mouse button will rotate the objects, again note how the shadows change accordingly.
Compiling and running the program
Once you have completed typing in the code, you can build and run the program in one of two ways:
- Click the small green arrow in the middle of the top toolbar
- Hit F5 (or Ctrl-F5)
(On Linux/OSX: In a terminal window, navigate to the directory containing the source file and simply type make. To run the program type ./simpleShadow.exe)
The output should look similar to below
To quit the program simply close the window.
While creating shadows using this technique is rather simple, there are two significant limitations. The first is that the shadows are only created on the x-z plane. If our "ground" is a plane with different orientation/location, this technique does not directly apply but can be extended to compute a correct shadow matrix for other planar surfaces. One other issue with this projection technique is that shadows will also be created for objects under the x-z plane. Usually this is dealt with by simply disallowing objects to go "underground".
A more significant limitation is that shadows only appear on the ground and not on any intermediate objects. This problem can be resolved (with much, much, much more complexity) using a sophisticated texture mapping technique. Basically the technique involves a multipass rendering scheme that keeps track of the nearest object to a light source and creates a shadow texture map that is applied to all other objects further away. More details and sample code can be found at:
http://www.paulsprojects.net/opengl/shadowmap/shadowmap.html
and
