The lab activity is described in the Activity_ section below.
Background
Android UI Widgets
Most views in an Android application contain various UI widgets that allow user interaction with the program. The types of widgets and their layout can be described either through XML files (good for static layouts) or created dynamically at run time programatically (good for dynamic layouts). We will explore designing UI layouts later in the course. For this lab, the view layout is contained in the res/layout/activity_main.xml file which will be loaded by the activity's .onCreate() method. An example file for a basic application that simply displays a single line of text is:
<?xml version="1.0" encoding="utf-8"?>
<LinearLayout xmlns:android="http://schemas.android.com/apk/res/android"
    android:layout_width="fill_parent"
    android:layout_height="fill_parent"
    android:orientation="vertical" >

    <TextView
        android:id="@+id/helloLabel"
        android:layout_width="fill_parent"
        android:layout_height="wrap_content"
        android:text="@string/hello" />

</LinearLayout>
Note that the TextView (which is basically a label) can be referred to in the application by its id (helloLabel in this example). The id allows us to access and/or modify a UI component. Thus, for example, we could programatically change the text for the label in the above Activity by
TextView label = (TextView) findViewById(R.id.helloLabel);
label.SetText("How are you?");
Here the method .findViewById() accesses the resources of the application through the R object (which contains all of the resources included in the app). Note the correspondance between the requested id and the one specified in the XML file.
HTTP requests in Android
Since Android applications are written in Java, we can utilize many of the same classes as we did on the PC when accessing web services. Thus we can issue requests and receive responses (possibly in JSON or XML) and process them in a similar fashion. In particular, we can use the same Apache HttpComponents. discussed in Lab 5a (For complete details, read the tutorial.) Hence an example web request to the geocoding service from Lab 5a might be
// Create HTTP client
HttpClient client = new DefaultHttpClient();

// Create list of request paramater/value pairs
List<NameValuePair> params = new ArrayList<NameValuePair>();
params.add(new BasicNameValuePair("postalcode", "17403");
params.add(new BasicNameValuePair("placeName", "725 Grantley Rd");
params.add(new BasicNameValuePair("country", "US"));
params.add(new BasicNameValuePair("username", "ycpcs_cs496"));

// Create URI
URI uri;
uri = URIUtils.createURI("http", "api.geonames.org", -1, "/postalCodeSearchJSON",
            URLEncodedUtils.format(params, "UTF-8"), null);

// Create HTTP request from uri
HttpGet request = new HttpGet(uri);

// Execute request and get response
HttpResponse response;
response = client.execute(request);

// Obtain the response body
HttpEntity entity = response.getEntity();
At this point, the web service has provided a JSON or XML response that we need to extract from the response payload and parse accordingly (after verifying the status code of the response). Since Android is Java based, we can use the same ObjectMapper class from the Jackson libraries to create Java objects from the JSON response.
Parsing JSON
To convert the HttpEntity object to JSON, we will extract the contents of the response body, use the JSON.getObjectMapper() method as before, and call the readValue() method (using getContents() on the entity extracted from the response) to convert the JSON-encoded response body to Java objects:
MyClass myObj = JSON.getObjectMapper().readValue(resp.getContents(), MyClass.class);
Note: If the JSON contains a list of objects, as long as our POJO contains a corresponding List<> field the ObjectMapper will take care of creating the list and assigning the appropriate values to the List items.
Activity
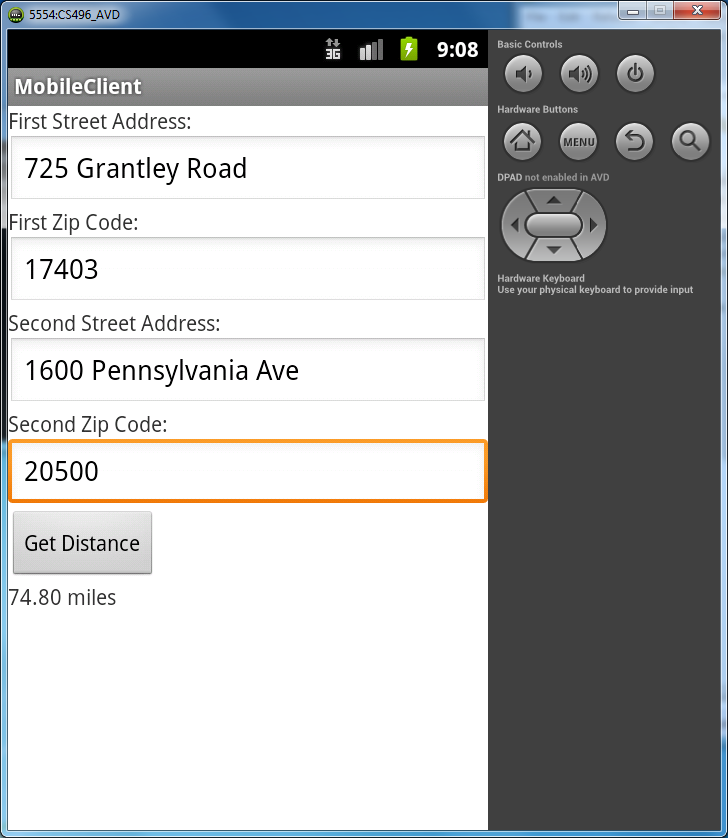
Your task is to duplicate the functionality from Lab 5a in an Android application.
Starting point code: CS496_Lab05b.zip. You should add code to MainActivity.java and .
As a reminder of the geocoding API:
Internet Access
IMPORTANT
Since this application will require access to the Internet, we must tell Android to allow permission for Internet access. This is done in the AndroidManifest.xml file (be sure to select the AndroidManifest.xml tab at the bottom of the editor window to view the XML text). Thus we need to add the following line just before the <application tag
<uses-permission android:name="android.permission.INTERNET" />
Hence the XML should look like
...
<uses-sdk
    android:minSdkVersion="10"
    android:targetSdkVersion="10" />

<uses-permission android:name="android.permission.INTERNET" />
<application
    android:allowBackup="true"
...
Model and Controller classes
Since the underlying object and controller classes are identical to the terminal web client from Lab 5a, we can reuse the model and controller classes from the CS496_Lab05_Geocoding.zip project. Unfortunately, since the Android application is bundled up before being transferred to the device, we must export the project as a JAR file and include it in the libs directory of the mobile app project.
- Right-click the CS496_Lab05b_Geocoding/src directory, select Export -> Java -> JAR File, navigate to the libs directory of the mobile app project in the workspace and give it a meaningful name (e.g. CS496_Lab05_Geocoding.jar).
- Right-click the CS496_Lab05b project and select Build Path -> Configure Build Path, select the Libraries tab, select Add JAR, navigate to the libs directory of the mobile project, and add the JAR file you created in the previous step.
Note how separating the model and controller classes from the UI allows for them to be shared between projects.
In this project, we will also have a local controller class to handle the GET requests thus further separating the UI from the underlying behavior.
Data input from widgets
Instead of obtaining the street addresses and zip codes from the terminal (via a keyboard scanner), in the ProcessRequest() method within the MainActivity class (i.e. UI view) the information should be retreived from the EditText widgets specified in the Activity's UI (refer to res/layout/activity_main.xml for the corresponding id's of the widgets). For example, to get an object corresponding to the text box for the first street address
EditText firstStreet = (EditText) findViewById(R.id.firstStreet);
- Then the getText() method can be called on the EditText object to retrieve the text currently in the text box (as an Editable object which can be converted to a string via the toString() method). Optional: At this point you could do some client-side validation of the inputs (e.g. a zip code that is not exactly 5 numerical digits) and indicate errors appropriately within the view.
- Instantiate a MobileController object to process the inputs by calling the getGeoDistance() method. This method takes four String parameters for the street and zipcodes and returns a Result object containing the computed distance (or null if either request failed).
- If the controller returns a valid result, you should display the distance in the distanceLabel widget or indicate an error. Note: the text of the label can be set using the setText() method of the label (you may want to format it appropriately).
Creating HTTP request
The HTTP requests will be handled in the MobileController class since it should not depend on the UI. This class contains two methods - getGeoDistance() and makeGeoGetRequest().
- getGeoDistance() should simply make two calls to makeGeoGetRequest() to obtain PostalCodes objects for each of the addresses provided via the parameters. If both addresses return valid (i.e. non-null) PostalCodes objects, then a ComputeDistance controller can be created to compute the distance using the findDistance() method
MakeGeoGetRequest() can be created in a similar fashion to Lab 5a by creating a List of NameValuePair objects corresponding to the necessary parameters and values needed for the request. You will need to have key/value pairs for the following parameters:
- postalcode - the zip code
- placeName - the street address
- country - should be set to "US"
- username - should be set to ycpcs_cs496
Once the parameter list is created, a URI object can be created and used to construct an HttpGet request which is executed through the HttpClient object's execute() method. The return value should be stored in an HttpResponse object.
Parsing the returned JSON data
Once the status code of the response is checked for success, the HTTP JSON response can be easily parsed using an ObjectMapper using the PostalCodes model class (which simply contains a List of PostalCode objects that represent the data for each location).