Getting Started
Import CS496_Lab06.zip into Eclipse (Import->General->Existing Projects into Workspace->Archive File).
You should see source code for an activity named Salutation.
Your Tasks
Absolute View Layout
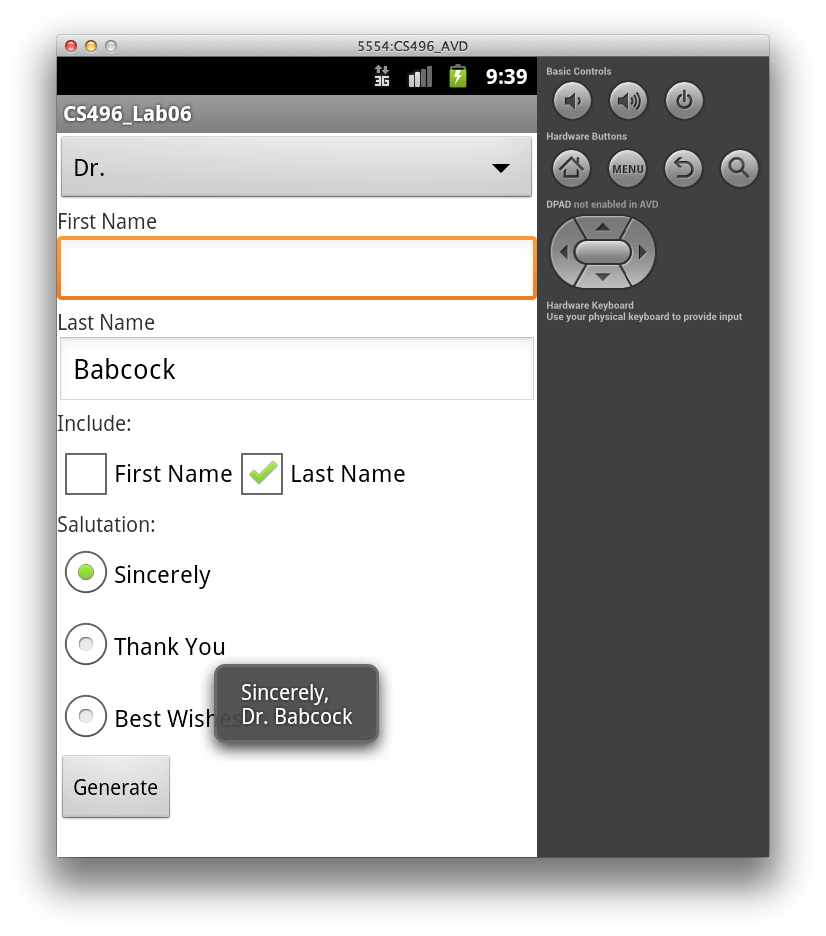
Create a layout for the view in activity_main.xml (inside the res/layout directory) to create a layout similar to
- Make sure to give each widget a unique id attribute.
- For the CheckBoxes, use the XML attribute fields to give the first name checkbox a click handler named onFirstNameClicked and for the last name checkbox a click handler named onLastNameClicked. (Note: for this lab these callbacks will not be used but callback stubs are provided in the activity class.)
- For the RadioButtons, give all of them the same onClick callback attribute.
- Do not give the button an onClick callback attribute.
Hint: For the CheckBoxes, consider placing them inside a nested LinearLayout with horizontal orientation to have them displayed side by side. Be sure to consider what the appropriate extent settings are for each widget.
Spinner Resource
In strings.xml (in the res/values directory), add the following resources:
- a string named titlePrompt with the value Title
- a string-array named titles with items (none), Mr., Mrs., Miss, and Dr..
Activity Code
Add code in Salutation.java for the following:
- In the Salutation class, add two private String variables named title and salutationMsg.
- In onCreate() add code to populate the Spinner widget by creating an ArrayAdapter from the string array resource defined in the previous section. Attach a TitleSelectedListener object to the spinner (which will be defined later).
- In the Salutation class, add a click handler for the radio buttons with the same name used in the layout resource. In the callback, set the salutationMsg field to the text from the selected RadioButton.
In the Salutation class, create a nested class named TitleSelectedListener that implements OnItemSelectedListener. This class should implement two public void functions named onItemSelected() and onNothingSelected() with appropriate parameters as shown in lecture06.
- In the onItemSelected() method, if the first item ((none)) is not selected retrieve the item from parent at location pos (use the getItemAtPosition() method), convert it to a string, and store it in title. (Otherwise set it to the empty string)
- In the onNothingSelected() method, simply set title to the empty string.
In onCreate() add code to add a click callback to the button widget. In the overridden onClick() method:
- Get objects for both CheckBoxes and EditText boxes.
- Show an error if neither CheckBox is selected (indicating no name was chosen)
- Show an error if a CheckBox is selected but the corresponding EditText is empty.
- Otherwise retrieve the names from the EditBoxes only for the ones that are selected and create a message string made up of the salutationMsg on the first line, and the title with selected names on the second line. Display the complete salutation in a Toast message.
Hint: Recall that to display a Toast message:
Toast.makeText(Salutation.this, msg, Toast.LENGTH_SHORT).show();
Relative View Layout
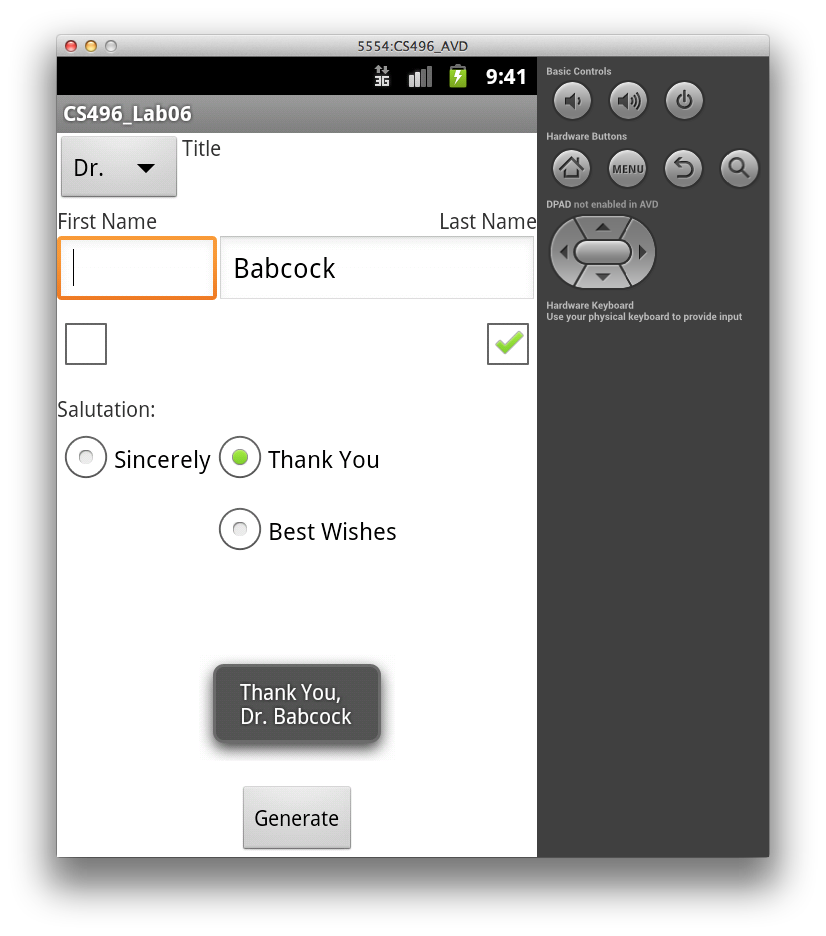
Once you have the absolute layout app working, modify the UI to use some relative layouts to produce the view as shown below:
You should not need to change any of the activity code.
Hints:
- Consider positioning the widgets that are relative to the parent window first (i.e. ones that are at the edges of the window)
- For the EditText boxes, place them in a (nested) horizontal LinearLayout with appropriate weights
- Align the CheckBoxes with respect to the corresponding EditText boxes (rather than the parent window)
- Use a (nested) TableLayout inside the RadioGroup to position the RadioButtons (note the first column of the second row is blank)
