All vertices passed into the graphics card are processed by a multi-stage graphics pipeline. The graphics pipeline is optimized to process graphics (as opposed to a more general purpose computing pipeline such as on the CPU) which provides a great deal of efficiency and program simplicity at the expense of a limited number of operations. As a graphics programmer, it will be your task to utilize the pipeline to do as much work as possible on the graphics card rather than on the CPU. The stages of this pipeline are shown in the figure below:
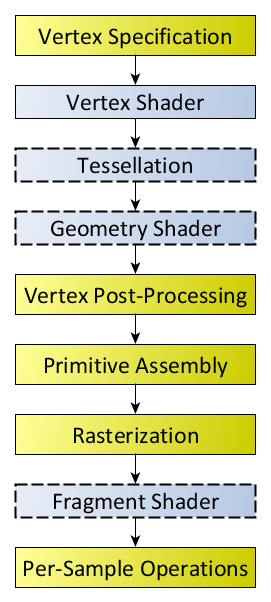
https://www.khronos.org/opengl/wiki/Rendering_Pipeline_Overview. Note: The stages shaded in blue are programmable, i.e. we can specify their behavior through shader code.
The two stages we will be considering in this course are:
- Vertex Shader - performs coordinate transformations (including projection and camera transformations) and assigns vertex colors
- Fragment Shader - applies pixel level effects such as texture mapping, per-pixel lighting, bump mapping, etc.
In this lab we will see how to load shaders from files and use them from within our programs by associating shader variables with references in our application.
Getting Started
Navigate into the CS370\labs directory on your H: drive.
Download CS370_Lab07.zip, saving it into the labs directory.
Double-click on CS370_Lab07.zip and extract the contents of the archive into a subdirectory called CS370_Lab07
Open CLion, select Open or Import from the main screen (you may need to close any open projects), and navigate to the CS370_Lab07 directory. This should open the project and execute the CMake script to configure the toolchain.
Loading Shaders
Shaders, like other source code files, are simply text files with a syntax similar to C. In order to create them, the utils.cpp contains a utility function we will use:
GLuint LoadShaders(ShaderInfo* shaders);
where shaders is an array of type ShaderInfo which specifies which shader file to associate with which shader stage and returns a reference to a shader program built from these stages. For example, if we have two variables vertex_shader and frag_shader that contain the paths to shader source files, we can build a shader program using
ShaderInfo shaders[] = { {GL_VERTEX_SHADER, vertex_shader},
                         {GL_FRAGMENT_SHADER, frag_shader},
                         {GL_NONE, NULL} };
program = LoadShaders(shaders);
Creating Shader Programs
The LoadShader() function performs several steps using the shader files specified in the parameter. First, we need to read the shader text from the file and store it in a character array. utils.cpp provides a ReadShader() function to perform this task. Next we will create various references to the program and the separate shaders using
GLuint glCreateProgram();
GLUint glCreateShader(GLenum shaderType);
where shaderType is the type of shader stage we are creating, e.g. GL_VERTEX_SHADER.
Next we will associate the shader source with the shader reference using
void glShaderSource(GLuint shader, GLsizei count, const GLchar **string, const GLint *length);
where shader is the reference returned from glCreateShader(), count is the number of shaders we are associating, string is an array of source strings, and length is an array containing the string lengths.
Once the source is associated with the reference, we will compile each shader stage using
void glCompileShader(GLuint shader);
where shader is the shader reference. We can check whether or not the compilation was successful using
void glGetShaderiv(GLuint shader, GLenum pname, GLint *params);
where shader is the shader reference for the shader we attempted to compile, pname is the parameter we wish to query (e.g. GL_COMPILE_STATUS), and *params is a reference to the return variable for the resulting query. Thus we can verify that the shader stage was compiled correctly, or retrieve some error log information if not.
If compilation was successful, we can then attach the shader to our program using
void glAttachShader(GLuint program, GLuint shader);
where program is the shader program reference and shader is the shader stage reference.
After we have compiled and attached all our stages, the last step is to link the stages to create the shader program using
void glLinkProgram(GLuint program);
where program is the shader program reference. Similar to compilation, we can query if linking was successful using
void glGetProgramiv(GLuint program, GLenum pname, GLint *params);
where program is the program reference, pname is the parameter we wish to query (e.g. GL_LINK_STATUS, and *params is a reference to the return variable for the resulting query. Thus we can verify that the program was linked correctly or retrieve some error log information if not.
Thus in our application we can create multiple shader programs using different vertex and fragment shader files if we wish to use different effects on different objects in our scene.
Tasks
NOTE: The global variables vertex_shader, mesh_shader, and frag_shader contain the filenames for the shader files. We will be using the same fragment shader with two different vertex shaders to create two shader programs.
-
Add code to main() to create the shader program from the mesh_shaders[] ShaderInfo array and store the resulting reference in mesh_program. This shader will be used to render objects loaded from .obj files with solid color
-
Add code to main() to create the shader program from the grad_shaders[] ShaderInfo array and store the resulting reference in grad_program. This shader will be used to render indexed objects with per vertex colors
You may wish to look at the code in utils.cpp to see how the ShaderInfo array is used to compile and link the various shader parts into a shader program.
Shader Variable References
Once we have created a shader program, we need to associate a reference in our application with the input shader variables to allow us to set the values of these shader variables during rendering. There are several types of shader variables:
-
uniform - values that are set once per object (i.e. are the same for all vertices), for example a transformation matrix or solid color
-
attribute - values that are set once per vertex (i.e. they may be different for each vertex), for example a color for gradient fill or lighting normals
Thus to associate a reference in the application we will use either
GLint glGetUniformLocation(GLuint program, const GLchar *name);
GLint glGetAttribLocation(GLuint program, const GLchar *name);
where program is the shader program and *name is a string with the name of the shader variable.
Tasks
NOTE: The shader variable are defined in color_mesh.vert and color_grad.vert. Even though the shader variables have the same name, they are separate variables since they will be in separate shader programs.
-
Add code to main() to set mesh_vPos reference to the corresponding vPosition shader variable as an attribute
-
Add code to main() to set the mesh_vCol, mesh_model_mat_loc, mesh_proj_mat_loc, and mesh_cam_mat_loc references to the corresponding shader variables as uniforms
-
Add code to main() to set the grad_vPos and grad_vCol references to the corresponding vPosition and vColor shader variables as attributes
-
Add code to main() to set the grad_model_mat_loc, grad_proj_mat_loc, and grad_cam_mat_loc references to the corresponding shader variables as uniforms
Activating Shaders
Prior to rendering an object, we need to activate the shader we wish to use for rendering using
void glUseProgram(GLuint program);
where program is the shader program to use.
Tasks
-
Add code to render_scene() to use the grad_program for the cube
-
Add code to render_scene() to use the mesh_program for the sphere
Passing Data to Shader Variables
Once we have references to the shader variables and selected the shader program we will be using, we can use the references for the program to pass the appropriate information when we render the objects.
Attribute Variables
Since attribute variables are set per vertex they are passed via the buffer objects. Thus after we bind the proper vertex array object and vertex buffer, we need to define the layout of each attribute component using
void glVertexAttribPointer(Gluint index, GLint size, GLenum type, GLboolean normalized, GLsizei stride, const void *pointer);
where index is the shader variable reference, size is the number of coordinates in the attribute, type is the datatype for the elements, normalized indicates whether to normalize the values in the range [-1,1], stride is the offset between consecutive data in the buffer, and *pointer is the offset of the starting location for the data (despite its awkward signature).
We will enable these attributes using
void glEnableVertexAttribArray(GLuint index);
where index is the reference to the corresponding shader variable location.
Uniform Variables
We can set the value of uniform vec4 vector shader variables from application variables using
void glUniform4fv(GLint location, GLsizei count, const GLfloat *value);
where location is the shader variable reference, count is the number of shader variables we wish to set (1 for a single vector and more than 1 if the shader variable is an array of vectors), and *value is the application variable containing the vector data to be passed to the shader. Note: There are several other versions depending on the number of components to pass and the data type of the elements, see the API.
For mat4 matrix shader variables, we can use
void glUniformMatrix4fv(GLint location, GLsizei count, GLboolean transpose, const GLfloat *value);
where location is the shader variable reference, count is the number of shader variables we wish to set (1 for a single matrix and more than 1 if the shader variable is an array of matrices), transpose is a flag specifying whether or not to transpose the matrix when it is passed, and *value is the application variable containing the matrix data to be passed to the shader. Note: There are several other versions depending on the size of the matrix to pass and the data type of the elements, see the API.
Tasks
-
Add code to render_scene() for the cube to define and enable the gradient vertex attributes grad_vPos after the CubePosBuffer has been bound. Use cubePosCoords for the number of components in the position, GL_FLOAT for the type, GL_FALSE for normalization, 0 for the stride, and NULL for the offset.
-
Add code to render_scene() for the cube to define and enable the gradient vertex attributes for grad_vCol after the CubeColBuffer has been bound. Use cubeColCoords for the number of components in the colors, GL_FLOAT for the type, GL_FALSE for normalization, 0 for the stride, and NULL for the offset.
-
Add code to draw_obj() for the mesh to define and enable the mesh vertex attributes for mesh_vPos after the Buffer has been bound. Use meshPosCoords for the number of components in the position, GL_FLOAT for the type, GL_FALSE for normalization, 0 for the stride, and NULL for the offset.
-
Add code to render_scene() for the cube to pass proj_matrix, camera_matrix, and model_matrix uniform matrices to the shader using their respective gradient shader references. We are only passing 1 matrix to each shader variable and do not need to transpose them (i.e. GL_FALSE)
-
Add code to render_scene() for the sphere to pass proj_matrix, camera_matrix, and model_matrix uniform matrices to the shader using their respective mesh shader references. We are only passing 1 matrix to each shader variable and do not need to transpose them (i.e. GL_FALSE)
-
Add code to render_scene() for the sphere to pass the sphere_color uniform vector to the shader using the mesh_vCol mesh shader references. We are only passing 1 vector to the shader variable
Compiling and running the program
You should be able to build and run the program by clicking the small green arrow towards the right of the top toolbar.
At this point you should see a gradient cube with a solid sphere on top that can be adjusted with a spherical coordinate perspective camera.

To quit the program simply close the window.
Congratulations, you have now used multiple shaders to pass different object data for rendering.
Next we will discuss the basics of how to write our own shaders.
