In the last lab we introduced basic lighting by creating materials and defining normals for our objects using a simple directional light. The light source we created was a single directional light source which was assumed to be at an infinite distance will all light rays parallel and thus striking the object at the same angle, e.g. the sun. While this produced a shading effect as the various faces of the cube rotated into and away from the light source, the effect was not very realistic since the coloring was only defined at the vertices and then interpolated across the faces producing various visual artifacts.
In this lab we are still going to use the Phong lighting model, but will create additional light sources, including point lights and spot lights, as well as address the shading issue by moving the lighting calculations from the vertex shader to the fragment shader, known as Phong Shading. Since the normals will be interpolated across the face when they are passed to the fragment shader, we will get a much smoother and well defined lighting effect at the expense of (possibly significant) efficiency.
Getting Started
Download CS370_Lab10.zip, saving it into the CS370-Fall2022 directory.
Double-click on CS370_Lab10.zip and extract the contents of the archive into a subdirectory called CS370_Lab10
Open CLion, select CS370-Fall2022 from the main screen (you may need to close any open projects), and open the CMakeLists.txt file in this directory (not the one in the CS370_Lab10 subdirectory). Uncomment the line
add_subdirectory("CS370_Lab10" "CS370_Lab10/bin")
Finally, select Reload changes which should build the project and add it to the dropdown menu at the top of the IDE window.
Solution
Download CS370_Lab10_Solution.zip, saving it into the CS370-Fall2022 directory.
Double-click on CS370_Lab10_Solution.zip and extract the contents of the archive into a subdirectory called CS370_Lab10_Solution
Open CLion, select CS370-Fall2022 from the main screen (you may need to close any open projects), and open the CMakeLists.txt file in this directory (not the one in the CS370_Lab10_Solution subdirectory). Uncomment the line
add_subdirectory("CS370_Lab10_Solution" "CS370_Lab10_Solution/bin")
Finally, select Reload changes which should build the project and add it to the dropdown menu at the top of the IDE window.
Point Lights
Another type of light source that we may wish to add to our scenes is a point light source, e.g. light bulb. This is a local light source, i.e. it has a position in world coordinates, that radiates light omnidirectionally, i.e. equally in all directions. Thus in addition to specifying the color channels for the ambient, diffuse, and specular components, we also will specify a position of the light source (note that this position is represented as vec4 with the last element set to 1.0). If desired, we could also incorporate attenuation for these light sources such that the further away from the light source an object is, the dimmer the light will be on that object (see the textbook for more details).
Tasks
-
Add code to build_lights() to create a LightProperties variable named whitePointLight that is a POINT light located at (3.0f, 1.0f, 3.0f, 1.0f) using (0.0f, 0.0f, 0.0f, 1.0f) for the ambient, (1.0f, 1.0f, 1.0f, 1.0f) for the diffuse, and (1.0f, 1.0f, 1.0f, 1.0f) for the specular. Note: Don’t forget to also add the pad to the structure.
-
Add code to build_lights() to add the whitePointLight to the Lights vector using the push_back() method.
-
Add code to build_lights() to set the numLights variable to the size of the Lights vector using the .size() method. Note: There is also a global lightOn[] array which can be used to toggle each light on/off. By default we will start with all the lights turned on.
Spot Lights
Spotlights are similar to point lights in that they have a position in the scene, but instead of being omnidirectional they are unidirectional, i.e. they only shine in one direction. Furthermore, their illumination is limited to a cone eminating from the source as shown in the figure below
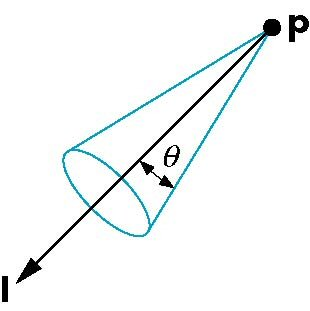
Thus to create a spotlight we need to specify the position of the light (again as a vec4), the direction in which the light is pointing (as a vec3), the width of the cone of illumination (known as the cutoff angle), and an attenuation factor defining how the intensity of the light varies from the center of the cone to the outer edge (known as the attenuation exponent). The default value for the exponent is 0 which produces uniform illumination throughout the illumination area. Positive values will produce brighter illumination at the center (directly in front of the light) and weaker illumination towards the boundary of the light cone. NOTE: Be careful when making very focused spotlights (e.g. a “laser pointer”) as the geometry of the scene may not have sufficient detail to render the point effect. Also remember that if your light (or material) has no specular components, the spotlight may have little to no effect.
Tasks
-
Add code to build_lights() to create a LightProperties variable named greenSpotLight that is a SPOT light located at (0.0f, 4.0f, 0.0f, 1.0f) pointing in the (0.0f, -1.0f, 0.0f, 0.0f) direction (directly above the object pointing straight down) with a cutoff angle of 30.0f and an exponent of 30.0f using (0.0f, 0.0f, 0.0f, 1.0f) for the ambient, (0.0f, 1.0f, 0.0f, 1.0f) for the diffuse, and (1.0f, 1.0f, 1.0f, 1.0f) for the specular. Note: Don’t forget to also add the pad to the structure.
-
Add code to build_lights() to add the greenSpotLight to the Lights vector using the push_back() method.
Phong Shading
Much of the computations for point and spot light sources is similar to Gouraud shading for directional lights from Lab10 only now we will need to pass information regarding the transformed vertex position and normal to the fragment shader. We will also need to compute the l vector as the difference between the light source position and the fragment (giving a vector pointing from the vertex to the light source). Also for spotlights, we will need to determine if the fragment is inside the cone of illumination for the spotlight and apply any attenuation depending on where in the cone the fragment falls.
Tasks
-
Add code to phong.frag in main() to copy the directional light computation into the point lights section but change the calculation of LightDirection to be the normalized difference between the light position and the fragment position (Note: This is the only difference between a point and directional light source)
vec3 LightDirection = normalize(vec3(Lights[i].position - Position)); -
Add code to phong.frag in main() to compute a spot light effect which is similar to a point light only with an additional calculation to determine if the fragment is in the cone of illumination of the spot light and attenuate the contribution depending on the illumination profile
  vec3 LightDirection = normalize(vec3(Lights[i].position - Position));
  // Determine if inside cone
  float spotCos = dot(LightDirection, -normalize(vec3(Lights[i].direction)));
  float coneCos = cos(radians(Lights[i].spotCutoff));
  if (spotCos >= coneCos) {
      vec3 HalfVector = normalize(LightDirection + NormView);
      float attenuation = pow(spotCos, Lights[i].spotExponent);
      // Diffuse
      float diff = max(0.0f, dot(NormNormal, LightDirection))*attenuation;
      rgb += diff*vec3(Lights[i].diffuse*Materials[Material].diffuse);
      if (diff > 0.0) {
          // Specular term
          float spec = pow(max(0.0f, dot(Normal, HalfVector)), Materials[Material].shininess)*attenuation;
          rgb += spec*vec3(Lights[i].specular*Materials[Material].specular);
      }
  }
Note: Notice that the light and material structs and arrays have been moved to the fragment shader.
Also note that a LightOn[] array is being passed to the fragment shader using the lightOn[] application array. This array will specify whether or not a particular light should be used for the lighting calculation, i.e. is turned on, or not. This will allow us to toggle different lights on/off for our scenes.
Compiling and running the program
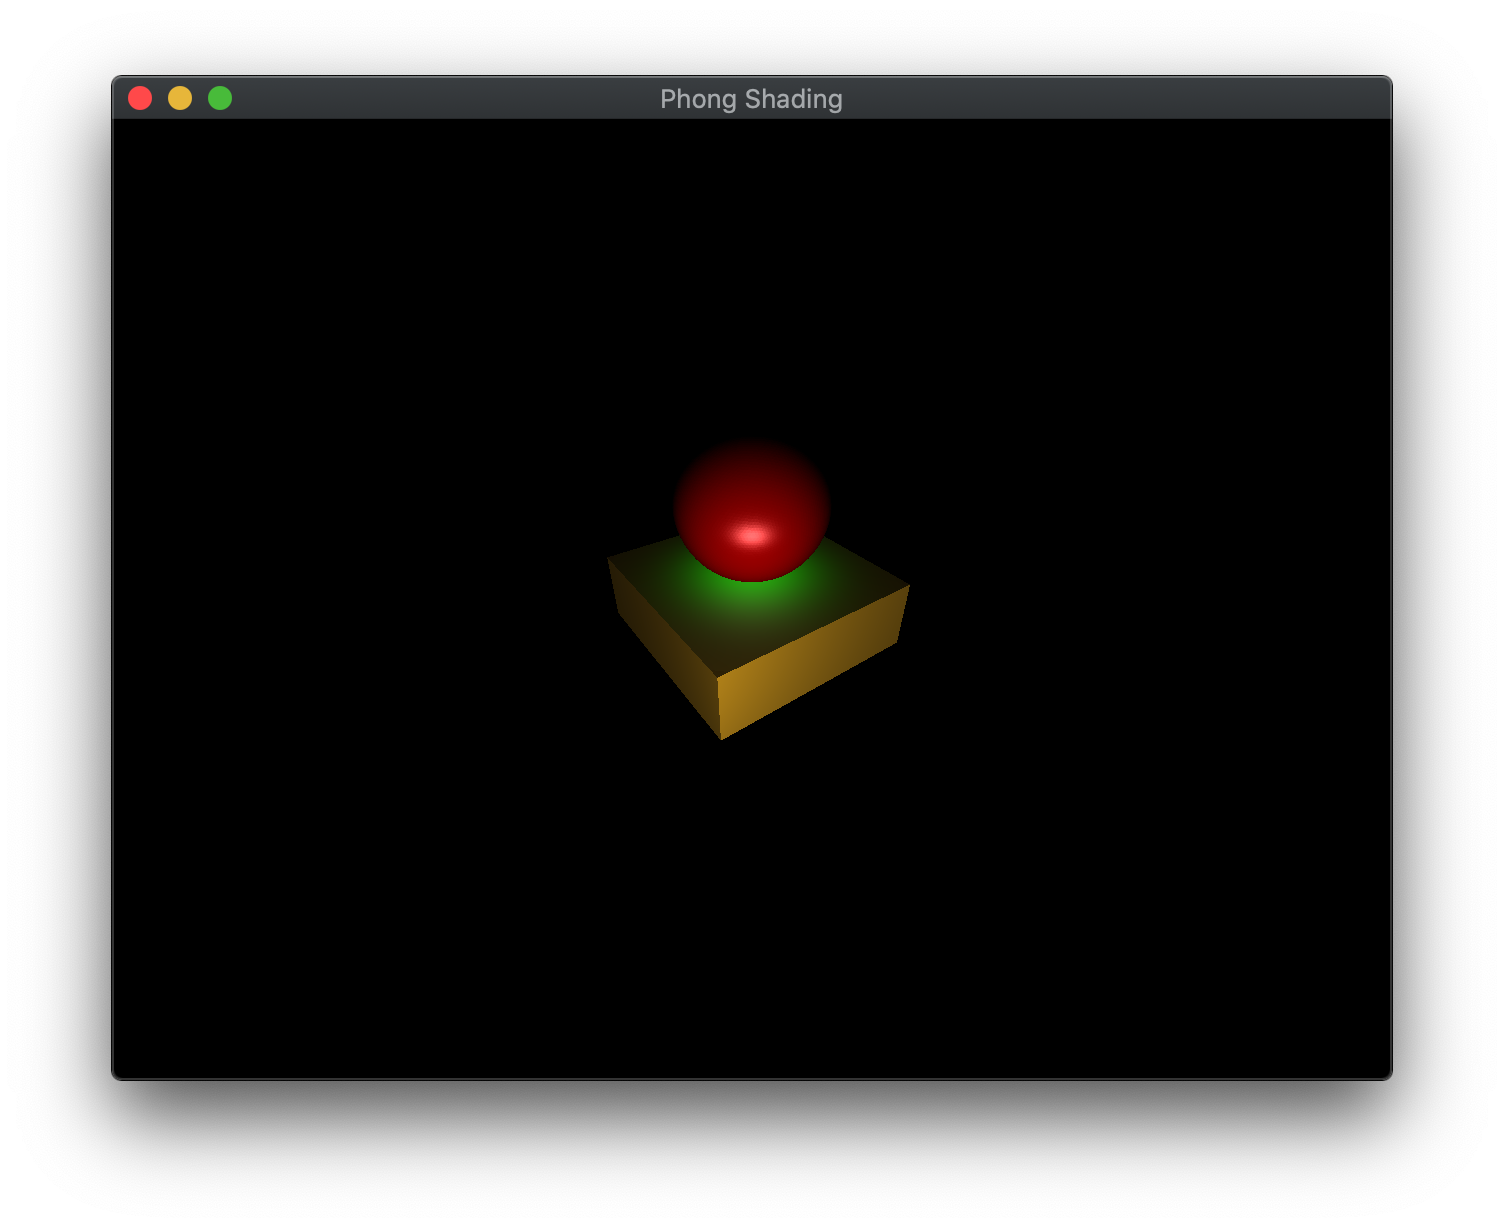
You should be able to build and run the program by selecting phongMesh from the dropdown menu and clicking the small green arrow towards the right of the top toolbar.
At this point you should see a spinning sphere and cube object with a point light and spot light illumination effect. L should turn the spotlight on/off and spacebar should toggle the animation.
To quit the program simply close the window.
Congratulations, you have now written an application with more advanced lighting.
Next we will investigate how to incorporate transparency into our scenes.
