Getting Started
Import CS496_Lab07.zip into Eclipse (Import->General->Existing Projects into Workspace->Archive File).
You should see source code for activities named MainTabView, ListTabActivity, and GridTabActivity.
Note that since we have multiple activities in the project, they have been declared in the AndroidManifest.xml file.
Your Tasks
In this lab we will create two different tab views for the NATO countries (stored as a string-array in values/strings.xml).
Set up tab view
First set up the tabs
- In activity_main.xml set up a vertical LinearLayout for the tabs using TabHost, TabWidget, and FrameLayout tags. NOTE: Be sure to give the widgets the following id's:
- TabHost an id of @android:id/tabhost
- TabWidget an id of @android:id/tabs
- FrameLayout an id of @android:id/tabcontent.
- In the MainTabView activity class, change the base class to TabActivity. Then add code to onCreate() to set up two tabs:
- The first is the ListTabActivity
- The second is the GridTabActivity
- Set the initial tab to the ListTabActivity tab. Simply use ic_tab1 icons for both tabs (later you may wish to experiment with changing the icons for each tab).
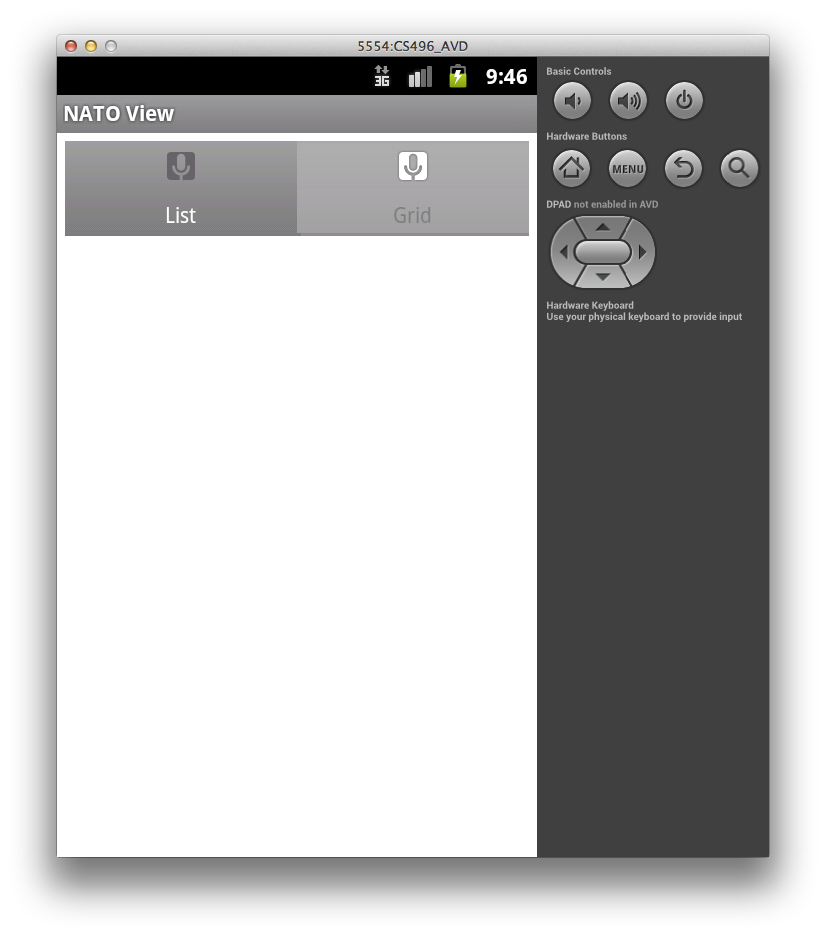
At this point you should have a basic tabbed view (with a simple TextView placeholder in each tab) which looks similar to
Set up list tab
To set up the list tab
- Create a file named list_item.xml in the res/layout directory and place a basic TextView in the file.
- In the ListTabActivity activity class, change the base class to ListActivity and remove the setContentView() call as we will be building the layout programmatically.
- Add code to onCreate() to build a ListAdapter from the string-array named countries provided in the strings.xml resource file, set the list adapter to this one, and then register an item click callback for the list view that displays a simple Toast message for the item selected.
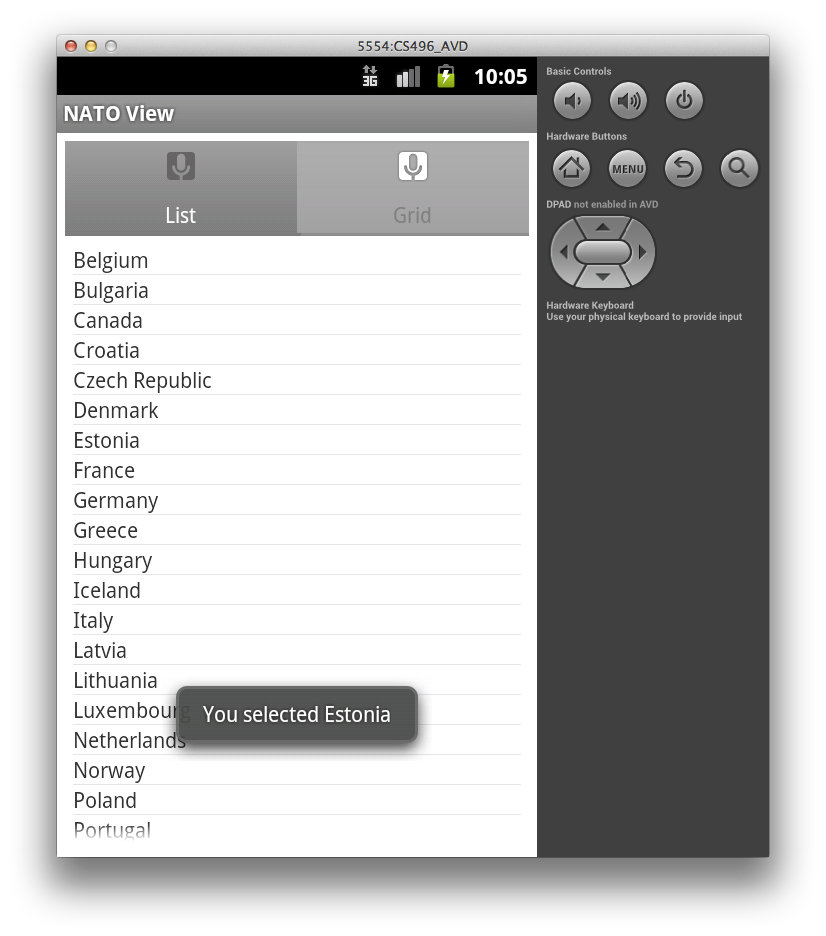
Now the list tab should appear as
Set up grid tab
To set up the grid tab
- In grid_layout.xml replace the TextView with a GridView (use the attributes from the example in lecture07).
- In the GridTabActivity activity class, add code to onCreate() to build an ArrayAdapter<String> adapter from the same string-array as the list tab, set the grid view adapter to this one, and register an item click callback for the grid view that displays a simple Toast message for the item selected.
The grid tab should appear as

Advanced Views [Optional]
For this lab use the code in the CS496_Lab07_Images project. Since this app is significantly more complicated, most of the code has been provided in the descriptions below.
We can enhance the appearance of our list/grid views by incorporating images into the items within the views. However to do this requires creating our own adapter subclasses from the BaseAdapter base class. We then need to override the getView() method which returns the view for each item to allow us to customize the returned views with whatever content we wish.
Extend grid tab to display flag images
In the res/drawable directory are thumbnail images for all the flags of the NATO countries (from wikipedia). We can create a custom ImageAdapter class (from the Android tutorials) that loads these images for the grid view.
Create custom ImageAdapter class
Create a new class named ImageAdapter which extends the BaseAdapter class which contains the following private fields (for references to the images) and public methods.
public class ImageAdapter extends BaseAdapter {
    // Reference to Activity context
    private Context mContext;

    // References to images
    private Integer[] mThumbIds = {
            R.drawable.belgium, R.drawable.bulgaria,
            R.drawable.canada, R.drawable.croatia,
            R.drawable.czechrepublic, R.drawable.denmark,
            R.drawable.estonia, R.drawable.france,
            R.drawable.germany, R.drawable.greece,
            R.drawable.hungary, R.drawable.iceland,
            R.drawable.italy, R.drawable.latvia,
            R.drawable.lithuania, R.drawable.luxembourg,
            R.drawable.netherlands, R.drawable.norway,
            R.drawable.poland, R.drawable.portugal,
            R.drawable.romania, R.drawable.slovakia,
            R.drawable.slovenia, R.drawable.spain,
            R.drawable.turkey, R.drawable.unitedkingdom,
            R.drawable.unitedstates
    };

    public ImageAdapter(Context c) {
        mContext = c;
    }

    public int getCount() {
        return mThumbIds.length;
    }

    public Object getItem(int position) {
        return null;
    }

    public long getItemId(int position) {
        return position;
    }

    // create a new ImageView for each item referenced by the Adapter
    public View getView(int position, View convertView, ViewGroup parent) {
        ImageView imageView;
        if (convertView == null) {  // if it's not recycled, initialize some attributes
            imageView = new ImageView(mContext);
            imageView.setLayoutParams(new GridView.LayoutParams(44, 30));
            imageView.setScaleType(ImageView.ScaleType.CENTER_CROP);
            imageView.setPadding(8, 8, 8, 8);
        } else {
            imageView = (ImageView) convertView;
        }

        imageView.setImageResource(mThumbIds[position]);
        return imageView;
    }
}
The important method is getView() which takes as a parameter the position of the particular cell which we can use to access the corresponding image from the resources. We then use the image resource to create an ImageView which is displayed in the grid cell.
In the GridTabActivity class, rather than using the string-array adapter, use an instance of the ImageAdapter by
gv.setAdapter(new ImageAdapter(this));
Now the grid tab should look like
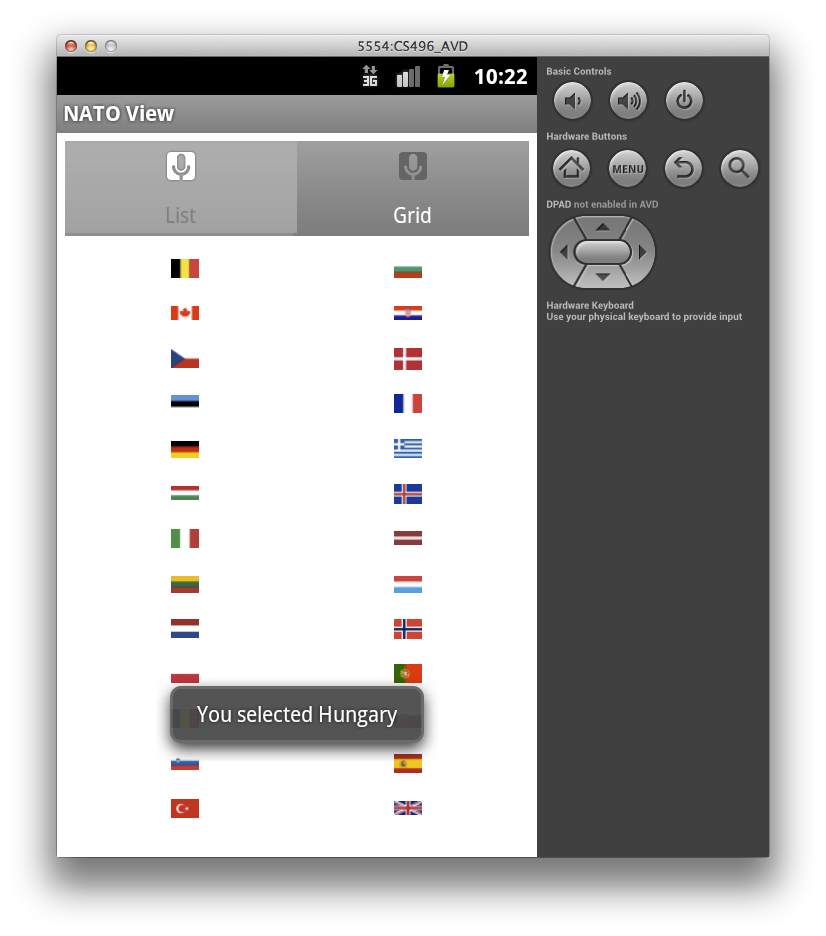
Note: In the item click callback, we use the pos parameter (returned by the getItemId() method in the ImageAdapter class) to access an element of the string array (retrieved from the string resources) containing the names of the countries to produce a Toast message with the selected country's name.
Extend the list tab to display images and text
Often it is useful to be able to customize the rows in a list view, e.g. to contain images and text. Again to accomplish this we will use a customized adapter class that populates the fields of a view defined by an XML file.
Create the view for rows in the list
Create a file named list.xml in the res/layout directory which will contain the layout for the rows. Since we want to have an image and country name text field, our layout could be:
<?xml version="1.0" encoding="utf-8"?>
<LinearLayout xmlns:android="http://schemas.android.com/apk/res/android"
    android:orientation="horizontal"
    android:layout_width="fill_parent"
    android:layout_height="wrap_content">
    <ImageView
    android:id="@+id/img"
    android:scaleType="centerCrop"
    android:layout_width="44dp"
    android:layout_height="30dp"/>

    <TextView
    android:layout_width="fill_parent"
    android:id="@+id/title"
    android:layout_height="wrap_content"
    android:textStyle="bold"
    android:textColor="#000000"
    android:textSize="16sp" />

</LinearLayout>
ListTabActivity
The ListTabActivity class now contains the following private fields
private LayoutInflater mInflater;
private Vector<RowData> data;
RowData rd;

// references to our images
private Integer[] imgid = {
        R.drawable.belgium, R.drawable.bulgaria,
        R.drawable.canada, R.drawable.croatia,
        R.drawable.czechrepublic, R.drawable.denmark,
        R.drawable.estonia, R.drawable.france,
        R.drawable.germany, R.drawable.greece,
        R.drawable.hungary, R.drawable.iceland,
        R.drawable.italy, R.drawable.latvia,
        R.drawable.lithuania, R.drawable.luxembourg,
        R.drawable.netherlands, R.drawable.norway,
        R.drawable.poland, R.drawable.portugal,
        R.drawable.romania, R.drawable.slovakia,
        R.drawable.slovenia, R.drawable.spain,
        R.drawable.turkey, R.drawable.unitedkingdom,
        R.drawable.unitedstates
};
which creates a local LayoutInflater object which will be used to parse out the XML layout file, a Vector of RowData objects for the entire list which will be used to initialize the custom adapter, a RowData object (to be defined later) which will create each individual row, and a local arrays containing the image references.
RowData
Add a local private class inside ListTabActivity named RowData as
private class RowData {
    protected int mId;
    protected String mTitle;

    // Constructor
    RowData(int id,String title){
        mId=id;
        mTitle = title;
    }

    @Override
    public String toString() {
        return mId+" "+mTitle;
    }
}
which simply has a constructor and a toString() method which returns a string representation for the row data.
CustomAdapter
Add a local private class inside ListTabActivity for the custom adapter named CustomAdapter that extends ArrayAdapter<RowData> as
private class CustomAdapter extends ArrayAdapter<RowData> {

    // Constructor
    public CustomAdapter(Context context, int resource,
        int textViewResourceId, List<RowData> objects) {

        super(context, resource, textViewResourceId, objects);
    }

    @Override
    public View getView(int position, View convertView, ViewGroup parent) {

        ViewHolder holder = null;
        TextView title = null;
        ImageView i11=null;

        // Create row from selected item
        RowData rowData= getItem(position);

        // Parse row layout file
        if(null == convertView){
            convertView = mInflater.inflate(R.layout.list, null);
            holder = new ViewHolder(convertView);
            convertView.setTag(holder);
        }
        holder = (ViewHolder) convertView.getTag();

        // Set TextView title
        title = holder.gettitle();
        title.setText(rowData.mTitle);

        // Set ImageView to image
        i11=holder.getImage();
        i11.setImageResource(imgid[rowData.mId]);
        return convertView;
    }
}
where the getView() method parses up the row XML layout using the LayoutInflater object and assigns the appropriate data to the different tags in the view using a ViewHolder object defined below.
ViewHolder
Add one more local private class inside ListTabActivity named ViewHolder as
private class ViewHolder {
    private View mRow;
    private TextView title = null;
    private ImageView i11=null;

    public ViewHolder(View row) {
        mRow = row;
    }
    public TextView gettitle() {
        if(null == title){
            title = (TextView) mRow.findViewById(R.id.title);
        }
        return title;
    }

    public ImageView getImage() {
        if(null == i11){
            i11 = (ImageView) mRow.findViewById(R.id.img);
        }
        return i11;
    }
}
which basically just contains getter methods for the various layout objects stored in a row.
Instantiate the adapter for the list
Using these helper classes, in the onCreate() method for the activity we can instantiate a CustomAdapter and use it to populate the list as
mInflater = (LayoutInflater) getSystemService(Activity.LAYOUT_INFLATER_SERVICE);
data = new Vector<RowData>();
for(int i=0;i<title.length;i++){

    try {
        rd = new RowData(i,title[i]);
    } catch (ParseException e) {
            e.printStackTrace();
    }
    data.add(rd);
}
CustomAdapter adapter = new CustomAdapter(this, R.layout.list,
                                         R.id.title, data);
setListAdapter(adapter);
getListView().setTextFilterEnabled(true);
where we obtain the LayoutInflater object for the activity, generate new rows for each of the items in the local arrays, create the adapter using the vector of row data, and finally use the adapter for the list.
An item click callback has been provided to display a Toast message when a row is selected.
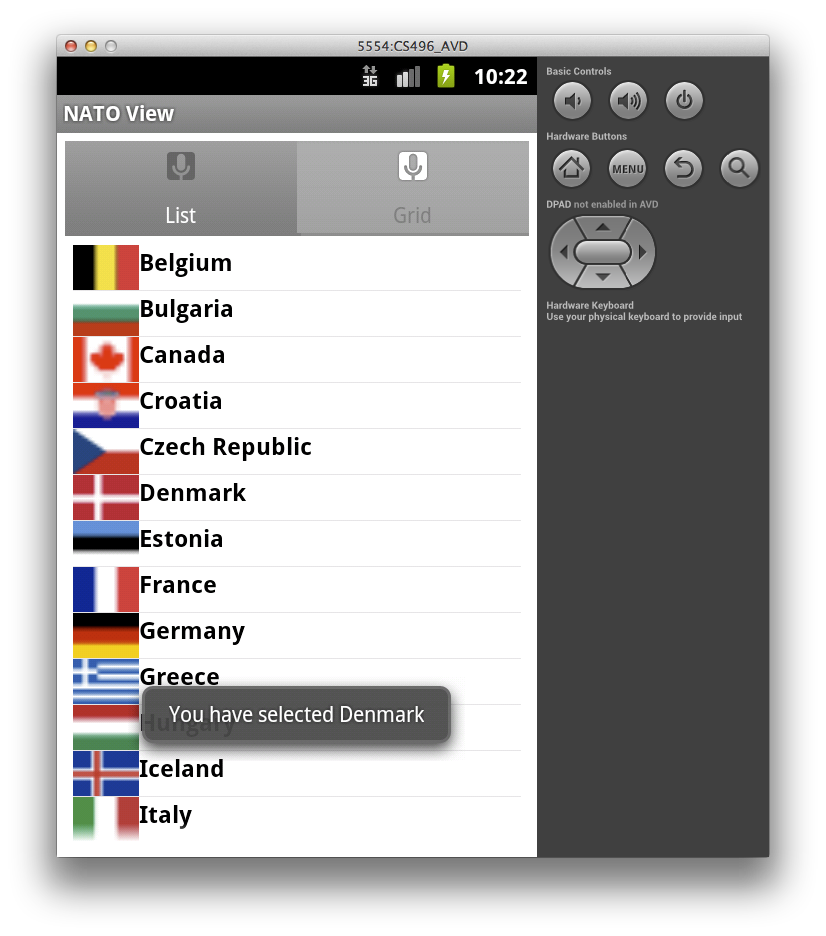
The list view should look similar to
This basic framework can be extended to add more widgets into the layout (via the list.xml XML file) with appropriate additional getters and field assignments to populate the new widgets.
