View Subclasses
In addition to the standard View class, Android provides several commonly used view subclasses:
- TabHost - displays tabs in the window to select between views (possibly for different Activities)
- ListView - displays items in a vertically scrolling format
- GridView - displays items in a 2D scrolling grid format
- ImageView - allows for the display of images
- SurfaceView - allows for a drawing surface to be created
If none of these (or several other provided subclasses) are appropriate for the application, custom views can also easily be created by subclassing the View class directly or by simply overriding existing behavior in one of the predefined View subclasses.
TabHost Layout
For a UI that contains a set of persistent tabs that allow the user to switch between views/activities, a TabHost viewgroup can be used. Often each tab will select a separate activity which itself will have a corresponding view.
TabWidget
Inside the TabHost layout, the tabs are specified by a TabWidget descriptor. These TabWidget components are placed into a LinearLayout along with a FrameLayout to determine where the tabs are placed relative to the content of the tabs. For Android TabHost's, the TabWidget must have its id set to tabs and the FrameLayout must have its id set to tabcontent. With these id's, the TabHost will then take care of changing the activities/views when tabs are selected. Hence XML code (in activity_main.xml) for the tabbed layout with the tabs at the top might be:
<?xml version="1.0" encoding="utf-8"?>
<TabHost xmlns:android="http://schemas.android.com/apk/res/android"
    android:id="@android:id/tabhost"
    android:layout_width="fill_parent"
    android:layout_height="fill_parent" >
    <LinearLayout
        android:layout_width="fill_parent"
        android:layout_height="fill_parent"
        android:orientation="vertical"
        android:padding="5dp">
        <TabWidget
            android:id="@android:id/tabs"
            android:layout_width="fill_parent"
            android:layout_height="wrap_content"
        />
        <FrameLayout
            android:id="@android:id/tabcontent"
            android:layout_width="fill_parent"
            android:layout_height="fill_parent"
            android:padding="5dp"
        />
    </LinearLayout>
</TabHost>
Note that the contents of the tabs themselves are not specified here, but will be set in a subclass of TabActivity later.
Tab Icons
Each tab will typically have small image icons (Android has a set of icon design guidelines for different types of icons including tabs) which will be stored in the res/drawable directories along with an XML file (known as a state-list drawable specifying the icon to use when the tab is selected and the one to use when the tab is unselected. For example, the XML (ic_tab1.xml) for a generic tab with images tab1_selected.png and tab1_unselected.png might be:
<?xml version="1.0" encoding="utf-8"?>
<selector xmlns:android="http://schemas.android.com/apk/res/android">
    <!-- When selected -->
    <item android:drawable="@drawable/tab1_selected"
          android:state_selected="true" />

    <!-- When not selected -->
    <item android:drawable="@drawable/tab1_unselected" />
</selector>
Note the icon images should be .png files with transparent backgrounds.
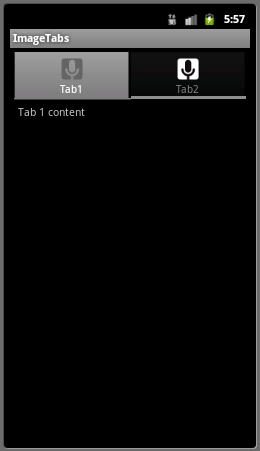
TabActivity
The tabbed layout is created by subclassing the TabActivity class and then setting up the various tabs in the onCreate() method by associating a TabHost object with the XML resource and creating the individual tabs by calling the newTabSpec() method on the TabHost object which takes as a parameter a string identifier for the tab. Each tab is also associated with an Intent which specifies the activity to start when the tab is selected. The text to be displayed in the tab, the icons to use for the tab, and the associated activity for the tab are then set with the setIndicator() method. Thus example code for creating a tab named "Tab1" that is associated with the Tab1Activity class and using a resource object res might be
Intent tab1Intent = new Intent().setClass(this, Tab1Activity.class);
TabHost.TabSpec tab1spec = tabHost.newTabSpec("tab1").setIndicator(
    "Tab1", res.getDrawable(R.drawable.ic_tab1)).setContent(tab1Intent);
tabHost.addTab(tab1spec);
Thus to create the entire tabbed layout, a Resources object is obtained (which allows the icons to be retrieved), a TabHost object is obtained, then TabHost.TabSpec objects are created for each tab. After all the tabs have been created, the initial one is specified by calling setCurrentTab() (tab indices start at 1). Hence a complete onCreate() method might be:
public void onCreate(Bundle savedInstanceState) {
    super.onCreate(savedInstanceState);
    setContentView(R.layout.main);

    // Get resources for the activity
    Resources res = getResources();

    // Get tabhost for the activity
    TabHost tabHost = getTabHost();

    // Create tabspec object
    TabHost.TabSpec tabSpec;

    // Create intent object
    Intent tabIntent;

    // Create first tab
    tabIntent = new Intent().setClass(this, Tab1Activity.class);
    tabSpec = tabHost.newTabSpec("tab1")
         .setIndicator("Tab1", res.getDrawable(R.drawable.ic_tab1))
         .setContent(tabIntent);
    tabHost.addTab(tabSpec);

    // Create second tab
    tabIntent = new Intent().setClass(this, Tab2Activity.class);
    tabSpec = tabHost.newTabSpec("tab2")
        .setIndicator("Tab2", res.getDrawable(R.drawable.ic_tab2))
        .setContent(tabIntent);
    tabHost.addTab(tabSpec);

    // Select first tab initially
    tabHost.setCurrentTab(1);
}
All that remains is to create the activity classes (with corresponding view layouts) for each individual tab similarly to previous lectures. Finally, each of these activity classes must be registered in the AndroidManifest.xml file using
<activity
    android:name=".Tab1Activity"
    android:label="Tab1Activity">
</activity>
Thus combining the above steps would produce a view similar to
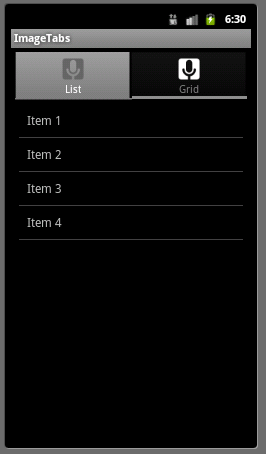
ListView
The ListView class is used to create a scrollable list of items using an Adapter subclass (similar to Spinners described in Lecture 6). The appearance of each list item is usually defined in an XML layout file (placed in the res/layout directory). For example to create list items that are simple TextViews, the following XML might be defined in a file named list_item.xml
<?xml version="1.0" encoding="utf-8"?>
<TextView xmlns:android="http://schemas.android.com/apk/res/android"
    android:layout_width="fill_parent"
    android:layout_height="fill_parent"
    android:padding="10dp"
    android:textSize="16sp" >
</TextView>
ListAdapter
To populate a ListView we use a ListAdapter which, for example, can be created from a string_array resource in a similar manner to the adapter used to create a Spinner. Thus if we have a string_array resource defined as:
<string-array name="list_array"
    <item>Item 1</item>
    <item>Item 2</item>
    <item>Item 3</item>
    <item>Item 4</item>
</string-array>
Then we can create an adapter that uses the preceeding item layout from this string by:
String[] listArray = getResources().getStringArray(R.array.list_array);
ListAdapter listAdapter = new ArrayAdapter<String>(this, R.layout.list_item, listArray);
Finally we create an activity that extends the ListActivity class, override the onCreate() method, and register a click handler for the list view as follows:
public void onCreate(Bundle savedInstanceState) {
    super.onCreate(savedInstanceState);

    // Create and populate list adapter
    String[] listArray = getResources().getStringArray(R.array.list_array);
    ListAdapter listAdapter = new ArrayAdapter<String>(this, R.layout.list_item, listArray);
    setListAdapter(listAdapter);

    // Get list view resource
    ListView lv = getListView();
    lv.setTextFilterEnabled(true);

    // Register click callback\
    lv.setOnItemClickListener(new OnItemClickListener() {
        public void onItemClick(AdapterView<?> parent, View view, int pos, long id) {
            // Do whatever desired with ((TextView) view).getText()
        }
    });
}
The above sample code would produce a list view (embedded in a tab) similar to
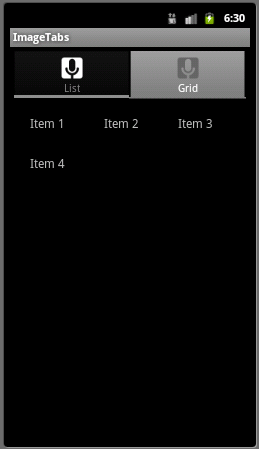
GridView
A GridView layout is similar to a ListView except that now the items are positioned in a 2D scrollable grid format. The layout is specified in XML for the view as:
<GridView xmlns:android="http://schemas.android.com/apk/res/android"
    android:id="@+id/gridview"
    android:layout_width="fill_parent"
    android:layout_height="fill_parent"
    android:columnWidth="90dp"
    android:numColumns="auto_fit"
    android:verticalSpacing="10dp"
    android:horizontalSpacing="10dp"
    android:stretchMode="columnWidth"
    android:gravity="center"
/>
Then similarly to the ListView, we simply specify an Adapter subclass to populate the grid cells and register a callback for when a cell is clicked. For example, the onCreate() method might be:
public void onCreate(Bundle savedInstanceState) {
    super.onCreate(savedInstanceState);
    setContentView(R.layout.main);

    GridView gv = (GridView) findViewById(R.id.gridview);

    // Populate adapter from string array resource
    String[] gridArray = getResources().getStringArray(R.array.list_array);
    ArrayAdapter<String> gridAdapter = new ArrayAdapter<String>(this, R.layout.list_item, gridArray);
    gv.setAdapter(gridAdapter);

    gv.setOnItemClickListener(new OnItemClickListener() {
        public void onItemClick(AdapterView<?> parent, View view, int pos, long id) {
            // Do whatever desired with ((TextView) view).getText()
        }
    });
}
The above sample code would produce a grid view (embedded in a tab) similar to