Due dates:
- Milestone 1:
- Code due: Friday, Nov 17th by 11:59 PM
- Milestone 2:
- Code due: Friday, Dec 1st by 11:59 PM
Getting Started
Start by downloading CS101_Assign06_Fa23.zip, saving it in the directory H:\CS101.
Start a Cygwin Bash Shell and run the following commands:
cd h:
cd CS101
unzip CS101_Assign06_Fa23.zip
cd CS101_Assign06_Fa23
Using Notepad++, open the files
H:\CS101\CS101_Assign06_Fa23\Scene.h
H:\CS101\CS101_Assign06_Fa23\Scene.cpp
H:\CS101\CS101_Assign06_Fa23\Player.h
H:\CS101\CS101_Assign06_Fa23\Player.cpp
You will add your code to these files. Note: we will be using separate files for the game play, scene structure, and player structures.
The file Chomp.cpp contains the provided game loop, and the file Const.h includes symbolic constants to use throughout the program. You should not need to modify either of these files.
A sample Windows executable is included in the .zip file and can be run in Cygwin by
./ChompSolWin
or for Mac in a terminal window
./ChompSolMac
(the sample executable compiled for Mac may be a bit erratic, try adjusting the terminal window size while the program is running).
Your Task
Since many of you have either played or at least seen the retro arcade game Pacman, the purpose of this assignment is to write a similar game using terminal graphics. The object of the game is to move your player around a board collecting pellets and power-ups while avoiding the 4 ghosts.
When you are ready to compile the program, in the Cygwin window type the command
make
To run the program, in the Cygwin window type the command
./Chomp.exe
Use CTRL-c to exit the program.
Program structure
Note: The board size is set by the symbolic constants WIDTH (=28) and HEIGHT (=22) in Const.h which can be used when accessing the elements of the 2D array.
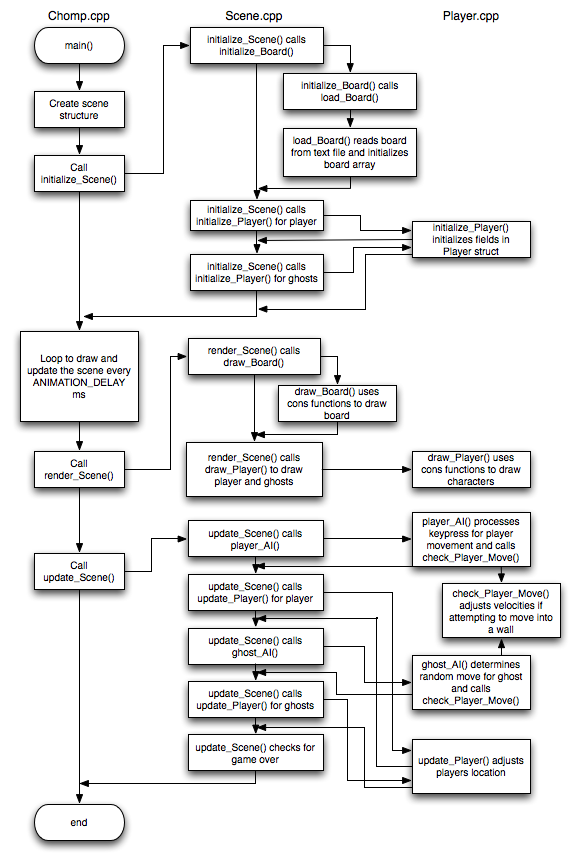
The overall layout of the program can be graphically illustrated by the following flowchart showing the relationships between the functions and which files they should be placed in:
Initializing the Board
Code has been provided to load in the game board and display it on the screen.
The following fields are defined in the Scene structure (in Scene.h)
- a 2D int array for the board
- an int for the number of pellets
- an int for the number of powerups
Loading in the board
The layout of the board is included in the text file board.txt where + indicates walls, . indicates pellets, and O indicates power ups.
The initialize_scene() function takes a Scene structure as a reference parameter. The function calls load_board() passing the board, number of pellets, and number of powerup fields by reference. load_board() reads the file and initializes a 2D board array parameter with the objects at each board location. Each element of the array will contain a symbolic constant for the object at that location as either:
- WALL - for a wall
- PELLET - for a pellet
- POWER_UP - for a powerup
- EMPTY - for an empty corridor
The function will also return the number of pellets (num_pellets) and number of power-ups (num_powerups) the board contains through reference parameters.
initialize_scene() will be modified in the milestones to perform other initializations for the player and ghosts.
Drawing the board
The render_scene() function then takes a Scene as a reference parameter and calls the draw_board() function passing the board field through the s pointer.
The draw_board() function takes a 2D array of int’s representing the board and renders the board on the screen. Symbolic constants have been defined for the characters to render as:
- WALL_CHAR - a blank space on a blue background
- PELLET_CHAR - a white period on a black background
- POWER_CHAR - a black uppercase O on a white background
- EMPTY - nothing (leaving it black on black)
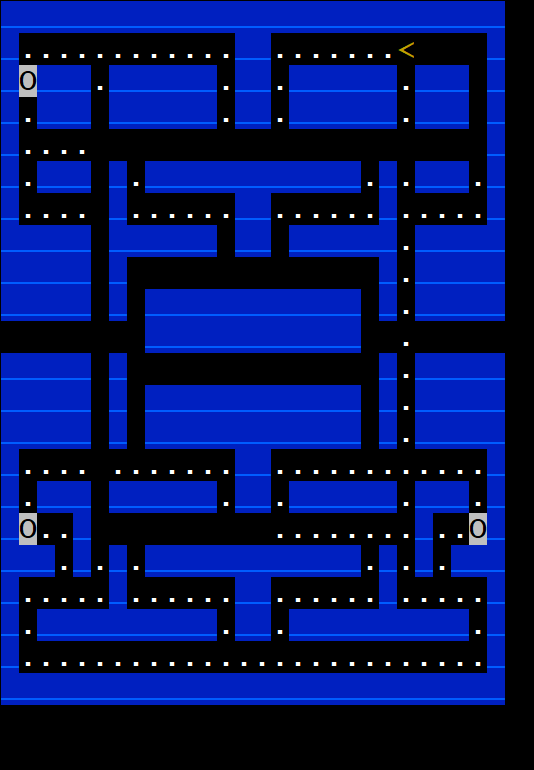
You should see something like this when you run the program:

Use CTRL-c to exit the program.
Milestone 1
Milestone 1 will add the player and allow them to move around the board eating pellets and power-ups.
You will need to first create a structure named Player and then add the following fields to the Player structure in Player.h
- an int for the player’s current x location
- an int for the player’s current y location
- an int for the player’s current dx velocity
- an int for the player’s current dy velocity
- a char for the player’s character symbol
- an int for the player’s color
Player functions
We will need to add accessor functions to initialize, draw and update the fields of the player.
-
Add a function to Player.cpp (placing the prototype in Player.h) named initialize_player() which takes a Player structure as a reference parameter (i.e. pointer), two int parameters for the starting x and y location, two int parameters for the starting dx and dy velocities, one char parameter for the player’s character symbol, and one int parameter for the player’s color. The function should initialize all the fields of the Player structure with the corresponding parameters. Hint: Since we have a pointer to a Player, we need to use -> to access the fields.
-
Add a function to Player.cpp (placing the prototype in Player.h) named draw_player() which takes a Player structure as a a reference parameter (i.e. pointer). The function should move the cursor to the player’s current location using cons_move_cursor, set the color for the player using cons_change_color, and draw the player using their symbol (from the fields in the structure) using cons_printw. Hint: Use the terminal graphics commands, see Lab 13 for the commands, and note that y is the row and x is the col. Since we have a pointer to a Player, we need to use -> to access the fields.
-
Add a function to Player.cpp (placing the prototype in Player.h) named player_ai() which takes a Player structure as a a reference parameter (i.e. pointer) and a 2D array of int’s for the board (use WIDTH and HEIGHT for the dimensions). The function should call the cons_get_keypress terminal graphics function which checks to see if the user has pressed a key and if so, returns an int for the key that was pressed (or -1 if no key was pressed). Symbolic constants are defined for the arrow keys as UP_ARROW, DOWN_ARROW, LEFT_ARROW, and RIGHT_ARROW (in Console.h). Based on the key that was pressed, the player’s velocity fields, i.e. dx and dy should be set appropriately (or set to 0 if no key was pressed). The function should then call check_player_move() (discussed below) to validate the desired move. Note: We are NOT updating the position of the player in this function, only determining where it is going to move based on the key pressed. Hint: Start by setting both dx and dy to 0. Then left and right movements should set dx, and up and down movements should set dy. Since we have a pointer to a Player, we need to use -> to access the fields. The player is already a pointer, so to pass it to check_player_move() we do not need the &.
-
Add a function to Player.cpp (placing the prototype in Player.h) named check_player_move() which takes a Player structure as a a reference parameter (i.e. pointer) and a 2D array of int’s for the board (use WIDTH and HEIGHT for the dimensions). The function should determine if the player is attempting to move into a wall (setting the velocities to 0 if they are) or moving through the tunnel which is at the edge of the board with y location given by the symbolic constant TUNNEL_Y. If they have entered the tunnel, the player’s position should be changed to the opposite side of the board. Hint: Determine the player’s desired new position and use those as indicies in the board array to check if that location is WALL. Since we have a pointer to a Player, we need to use -> to access the fields.
-
Add a function to Player.cpp (placing the prototype in Player.h) named update_player() which takes a Player structure as a a reference parameter (i.e. pointer). The function should update the player’s current location based on their current velocity. Hint: Since we have a pointer to a Player, we need to use -> to access the fields.
Scene functions
Next we need to incorporate the player into the scene.
-
Add a Player field to the Scene structure for the user in Scene.h
-
Add code to initialize_scene() to call initialize_player() for the user. The arguments in the function call should initialize the fields of the structure so the player starts at location (PLAYER_HOME_X, PLAYER_HOME_Y) with both velocity components equal to 0 (i.e. not moving). The player’s symbol and color should be initialized with PLAYER_CHAR and PLAYER_COLOR (which are defined in Const.h if you wish to change them). Hint: Since the s parameter is a pointer to a scene, use -> to access the player field. However, since we need to pass the player field by reference, use the & as well, e.g. if the player field is p then the argument would be &(s->p).
-
Add code to render_scene() to call draw_player() to draw the player on the board (note this should be done after drawing the board). Hint: Since the s parameter is a pointer to a scene, use -> to access the player field. However, since we need to pass the player field by reference, use the & as well, e.g. if the player field is p then the argument would be &(s->p).
-
Add code to update_scene() (which takes a Scene structure as a reference parameter and returns an int value which will be a flag indicating when the game is over) to call the player’s player_ai() function to see if they have pressed a key (which determines the player’s desired velocity and computes their actual velocities) and then update_player() to update the player’s current location based on their velocities. The function should then determine if the player has ended up on a pellet or power-up and adjust the board (along with the pellet or power-up counters) accordingly. Hint: Since the s parameter is a pointer to a scene, use -> to access the player field. However, since we need to pass the player field by reference, use the & as well, e.g. if the player field is p then the argument would be &(s->p).
At this point you should be able to move the player around the board “gobbling” up the pellets and power-ups.
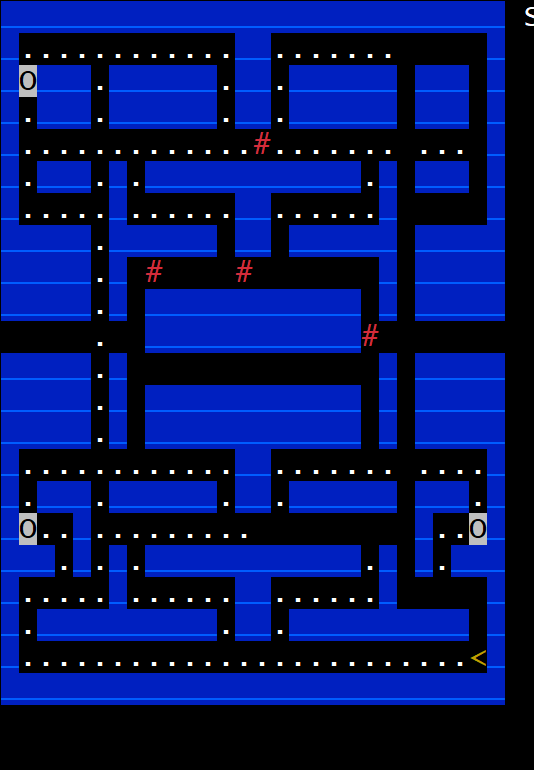
You should see something like this when you run the program:
Deliverables for Milestone 1
The code for Milestone 1 should be submitted to Marmoset (using the command make submit_ms1) by the end of the day on Friday, Nov 17th.
Submitting Milestone 1
To submit your code, make sure all the files are saved, and in the Cygwin window type
make submit_ms1
Approach/Hints
DEVELOP INCREMENTALLY! Use CTRL-c to exit the program.
Step 1: Add the Player struct in Player.h
Step 2: Add the initialize_player and draw_player accessor functions in Player.cpp (with prototypes in Player.h)
Step 3: Add a Player field to the Scene struct in Scene.h
Step 4: Add a call to initialize_player to initialize_scene in Scene.cpp
Step 5: Add a call to draw_player to render_scene in Scene.cpp.
You should now see the player character on the board.
Step 6: Add the player_ai (without check_player_move) and update_player functions in Player.cpp (with prototypes in Player.h)
Step 7: Add a call to player_ai followed by a call to update_player to update_scene in Scene.cpp
You should now be able to move the player anywhere around the screen.
Step 8: Add the check_player_move function to Player.cpp (with the prototype in Player.h) to simply check if the current move would place the player in a wall and if so resetting the velocities to 0.
Step 9: Add a call to check_player_move to player_ai in Player.cpp after the keypress sets the desired velocities.
You should now only be able to move the player around the corridors on the board.
Step 10: Add code to update_scene in Scene.cpp after the call to update_player to check if the player’s location on the board is a PELLET or POWER_UP, and if so set that board location to EMPTY decrementing either num_pellets or num_powerups.
At this point you should be able to move the player around the corridors on the board gobbling up the pellets and power-ups (thus Chomp, Chomp, Chomp!)
Step 11: Add code to check_player_move to determine if the player is at one of the tunnel entrances and trying to move into the tunnel, and if so modifying the player’s x field to the other side of the board.
Finally you should be able to move around the corridors on the board gobbling up pellets and power-ups along with going through the tunnel.
Milestone 2
Milestone 2 incorporates the ghosts to complete the game play. The ghosts will simply be represented by an array of Player’s that uses a different function to determine their desired velocities (basic AI).
You will need to first add a field to the Scene structure (in Scene.h)
- an array of type Player for the ghosts. It should be of size NUM_GHOSTS (a symbolic constant in Const.h).
and the Player structure (in Player.h)
- an int for the player’s score
Player functions
Note the draw_player(), check_player_move(), and update_player() functions can be used for both the user and ghosts without modification.
-
Add code to initialize_player() to initialize the score field.
-
Add a function to Player.cpp (placing the prototype in Player.h) named ghost_ai() which takes a Player structure as a reference parameter (i.e. pointer) and a 2D int array for the board. The function should simply keep the current velocities the same with a probablity of 75% (unless both the current velocities are 0), otherwise the velocities should be set by randomly selecting either the x or y direction and then generating a random value of +1 or -1 for dx or dy. The function should then call check_player_move() to determine the actual velocity for the ghost, i.e. make sure it is not trying to move into a wall and/or adjust for going through the tunnel.
Scene functions
-
Add code to initialize_scene() to call initialize_player() for each of the ghosts, i.e. for each element of the ghost array. The arguments in the function call should initialize the fields of the structure so the ghosts start at a random x location within two units of GHOST_HOME_X with the same y location GHOST_HOME_Y. The velocity components should be randomly set to either +1 or -1 for dx and 0 for dy (i.e. randomly moving left or right). The ghost symbol and color should be initialized to GHOST_CHAR and GHOST_COLOR (from Const.h).
-
Add code to render_scene() to call draw_player() to draw the ghosts on the board (note this should be done after drawing the board but can be either before or after drawing the player). Also add drawing code to display the player’s score next to the board.
-
Add code to update_scene() to call the functions for the ghosts (with the only difference being that ghost_ai() is used instead of player_ai()). Additionally after updating each ghost, you should check if the player has ended up on a ghost and return “true” to end the game. Update the player’s score if they have moved onto a pellet or power-up by amounts PELLET_VAL and POWER_VAL. The game should also end once there are no more pellets and power-ups remaining on the board.
At this point you will have a playable game, but the ghosts will move extremely fast (although not very intelligently). To make the ghosts move at a more reasonable speed, determine a way to only update them every GHOST_DELAY (another constant in Const.h) update cycles. Hint: consider adding a counter field to the Scene structure and checking it in update_scene().
You should see something like this when you run the program:
Deliverables for Milestone 2
The code for Milestone 2 should be submitted to Marmoset (using the command make submit_ms2) by the end of the day on Friday, Dec 1st.
Submitting Milestone 2
To submit your code, make sure all your files are saved, and in the Cygwin window type
make submit_ms2
Approach/Hints
This milestone is actually somewhat simpler as you will be reusing many of the functions from Milestone 1.
DEVELOP INCREMENTALLY! Use CTRL-c to exit the program.
Step 1: Add an array of Player structs field in Scene.h for the ghosts
Step 2: Add a call to initialize_player to initialize_scene for each ghost in Scene.cpp (Hint: use a loop).
Step 3: Add a call to draw_player to render_scene for each ghost in Scene.cpp (Hint: use a loop).
You should now see the ghosts on the board.
Step 4: Add the ghost_ai function in Player.cpp (with a prototype in Player.h)
Step 5: Add a call to ghost_ai followed by a call to update_player for each ghost to update_scene in Scene.cpp (Hint: use a loop).
You should now see the ghosts moving around the screen (but not capturing the player).
Step 6: Add a score field to the Player struct in Player.h, initialize it to 0 in initialize_player in Player.cpp, display it to the right of the board in render_scene in Scene.cpp, and update its value in update_scene whenever the player eats a pellet or power-up.
You should now see a changing score as the player moves around the board.
Step 7: Add code to update_scene after each ghost is updated to check if it is at the same location as the player, and if so return true indicating game over. Also check if num_pellets and num_powerups are both 0, and if so return true indicating game over.
You should now have a fully functional game!
Step 8: Add a counter field to the Scene struct, initialize it in initialize_scene, and increment it in update_scene. Then in update\scene only call ghost_ai and update_player for the ghosts whenever the counter exceeds GHOST_DELAY to slow things down.
Grading
Your grade will be determined as follows:
Milestone 1 - 75 points
- Player struct: 5
- initialize_player(): 10
- draw_player(): 10
- player_ai(): 15
- check_player_move(): 10
- update_player(): 10
- Player field in Scene struct: 5
- call Player functions in Scene: 10
Milestone 2 - 75 points
- Ghosts array and score field: 5
- initialize ghosts and score: 15
- draw ghosts and score: 10
- ghost_ai(): 20
- update ghosts: 10
- check for ghost capture: 10
- check for empty board: 5
We expect you to use good coding style. Points may be deducted for poor variable names, inconsistent or missing indentation, and/or lack of comments.
Extra Credit - 50 points
Improve player character - 5 points
Currently the program uses the < character for the player, regardless of the direction the player is moving. Alternatively, it looks better if the player’s “mouth” is open in the direction of motion to look like they are “eating” the pellets and power-ups. One way to accomplish this is to change the player’s character field in player_ai based on the direction of motion such that
- < is used when dx is 1 (i.e. moving right)
- > is used when dx is -1 (i.e. moving left)
- v is used when dy is -1 (i.e. moving up)
- ^ is used when dy is 1 (i.e. moving down)
Improve the ghost AI - 10 points
One drastic improvement that can be made to the ghost AI is rather than select a random direction to attempt to move (which often results in moving into a wall), select only from the valid directions the ghost can move (with a strong preference to continue moving in its current direction, a lesser preference to turn if possible, and with a relatively small preference to turn around). This will make the ghost movement appear much smoother (and smarter). Additionally the ghost’s prefered direction can be further biased towards the player if they are within a certain range of the player (basically providing a “chase” mode when they are close). There should be a small probability that the ghost will stop chasing otherwise the game will become very difficult to play (the ghosts will essentially ambush the player pinning them in a corner).
Additional levels - 10 points
Alternate levels can be designed using the same symbols as board.txt, i.e. + for walls, . for pellets, O for power-ups, and blanks for empty locations. Make sure your boards are 28 characters wide by 22 characters high (to match the board array used in the load_board() function). Be careful if you choose to use tunnels that they are at row TUNNEL_Y otherwise you will need to modify the check_player_move() function. Once a level is completed, load and begin another level.
Capturable ghosts - 25 points
Probably the most complicated improvement (in the spirit of the original video game) is to allow the ghosts to be “captured” for a brief period of time after the player “eats” a power-up. If the player and ghost are at the same location during this time, the player earns extra points and the ghost is returned to its home location while no longer being capturable. The player should receive some type of warning that the capturable time is about to expire. In the original game, the ghosts would turn blue while they were capturable and flash when they were about to become non-capturable. Consider adding flags to the Player structure that tracks the state of each ghost and a counter to the Scene structure that is set to a value and counts down whenever a power-up is eaten (and can be used to determine when to make the ghosts “flash”).
Submitting
To submit your code, make sure all the files are saved, and in the Cygwin window type one of the following commands (depending on whether you are submitting Milestone 1 or Milestone 2).
For Milestone 1:
make submit_ms1
File Milestone 2:
make submit_ms2
Enter your Marmoset username and password (which you should have received by email.) Note that your password will not be echoed to the screen. Make sure that after you enter your username and password, you see a message indicating that the submission was successful.
Make sure that you check the file(s) you submitted to ensure that they are correct. See the instructions for Verifying your submission.
