Getting Started
Refer to Lab 1 if you need a reminder about how to start Cygwin Terminal or Notepad++.
Start by downloading CS101_Lab13.zip, saving it in the directory H:\CS101.
Start a Cygwin Terminal and run the following commands:
cd h:
cd CS101
unzip CS101_Lab13.zip
cd CS101_Lab13
Using Notepad++, open the files
H:\CS101\CS101_Lab13\Grayscale.cpp
H:\CS101\CS101_Lab13\Fade.cpp
H:\CS101\CS101_Lab13\RGB.cpp
To compile the programs, run the command
make
To run a program, use one of the following commands (as appropriate):
./Grayscale.exe
./Fade.exe
./RGB.exe
Your Task
In this lab, you will write programs to transform a photo of an adorable kitten (source: placekitten.com):
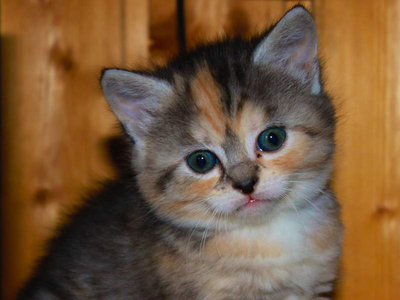
This image is included in the lab as a file called kitten.bmp.
Each of the three programs looks like this:
WIDTH and HEIGHT are constants representing the width (400 pixels) and height (300 pixels) of the photo. The ReadImage function reads the data representing each pixel of the kitten photo, and stores them into arrays called red, green, and blue.
There are three arrays because each pixel of the image is broken into red, green, and blue color component values. (These are the three basic colors that the human eye can see.) For the pixel at column i and row j of the photo,
red[i][j] is the red component of the pixel
green[i][j] is the green component of the pixel
blue[i][j] is the blue component of the pixel
Each color component value is an integer in the range 0..255. 0 is the least intense value, and 255 is the most intense value.
You can transform the image by adding code at the TODO comment to change the values in the array. For the first two programs (Grayscale.cpp and Fade.cpp), you will store transformed values directly in the red, green, and blue arrays. For the third program (RGB.cpp), you will store the transformed values in the red_out, green_out, and blue_out arrays.
The WriteImage function (or WriteImageDoubleSize function in the third program) will generate a new image file based on the transformed color values computed by your program. You can use a web browser to view the transformed image. (Press Control-O in the web browser to bring up the open file dialog, and choose the output file you want to view.)
Grayscale
In the program Grayscale.cpp, transform the image to a grayscale image:
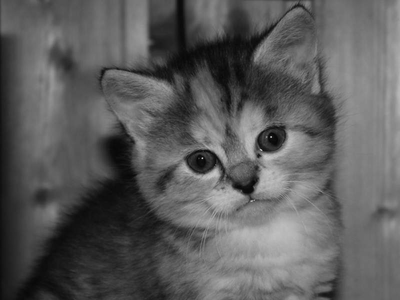
Here is how to do this. Gray colors are generated by creating pixels where the red, green, and blue values are equal. Let’s say that we are transforming the pixel at column i and row j. Let r be the red component, g be the green component, and b be the blue component. Each component of the pixel should be changed to equal an integer close to
(0.31 × r) + (0.5 × g) + (0.19 × b)
Run the program as
./Grayscale.exe
View the resulting image by opening grayscale.bmp in your web browser.
Fade
In the program Fade.cpp, implement a nifty Instagram-style fade effect:
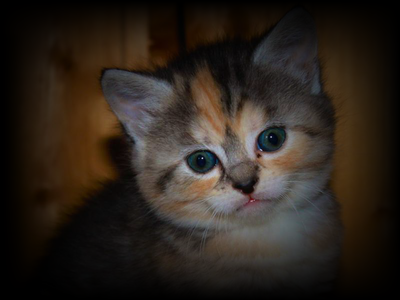
[Note: if, like Instagram, you can turn this idea into a billion-dollar company, please consider giving your CS 101 instructor an equity stake.]
Here’s how to do this. For a pixel at column i and row j, compute hdist and vdist values:
hdist = (i+1) / WIDTH
vdist = (j+1) / HEIGHT
hdist and vdist represent the relative distance of the pixel from the left edge and top edge of the image, respectively, in the range 0..1. (Be careful to use floating point operations rather than integer operations to compute these values.)
Next, compute the fade coefficient as
fade = sin(hdist × M_PI) × sin(vdist × M_PI)
Finally, change the red, green, and blue component values for the pixel by replacing them with a value that is an integer close to fade times their original value. The fade coefficient will darken pixels that are closer to the edges of the image.
Run the program as
./Fade.exe
View the resulting image by opening fade.bmp in your web browser.
RGB
In the program RGB.cpp, create a large image with 4 copies of the original image. The top left, top right, and bottom left copies should preserve only the red, green, and blue color component values, leaving the other component values as 0. The bottom right copy should be identical to the original image. So, it should look like the following image (click for full size):
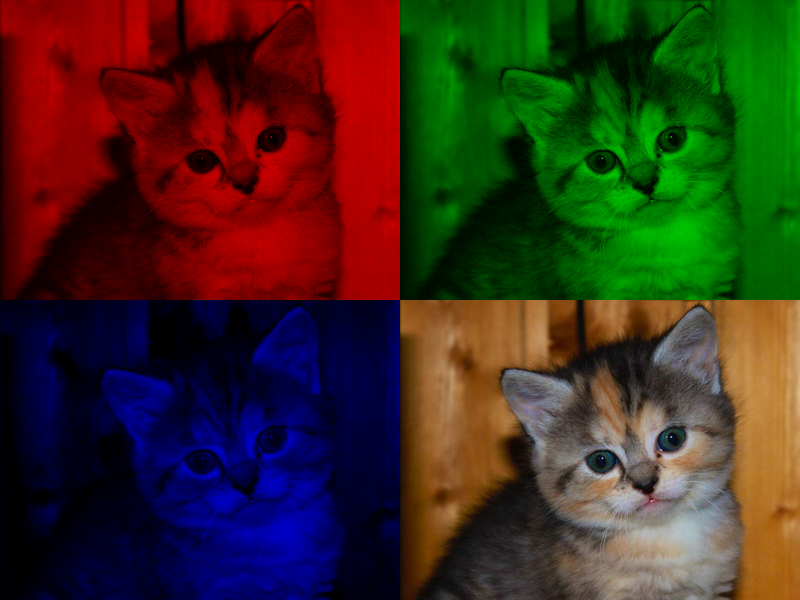
Note that this program uses larger arrays called red_out, green_out, and blue_out to store the output image, with twice the number of rows and columns as the original arrays. So, in this program, you will set values in the the output arrays rather than modifying the value in the original input arrays.
Useful hint: You may assume that all of the elements of the red_out, green_out, and blue_out arrays will be set to 0 initially.
Run the program as
./RGB.exe
View the resulting image by opening rgb.bmp in your web browser.
Submitting
To submit your work, type the command
make submit
Enter your Marmoset username and password (which you should have received by email.) Note that your password will not be echoed to the screen.
