While multi-texturing is a nice way to further enhance the appearance of surfaces in our scene without adding additional geometry, unfortunately, the surfaces still appear flat, particularly with respect to lighting. One technique (that is based on multi-texturing) to create an even more realistic appearance of a rough surface is to adjust the normals to produce a self-shadowing effect known as bump mapping. Since normals are applied per vertex and then interpolated across the surface (per fragment) in the pipeline, this would require using extremely complex geometries to capture sufficient surface detail. However we can simulate this effect through self-shadowing which gives the appearance of a slightly varying, i.e. rough, surface based on a normal map which is stored in a texture. This normal map (which being a texture is applied on a per pixel basis) can then be used in the fragment shader to define the varying normals per pixel in order to produce a changing lighting effect across each fragment, i.e. bump mapping. This will be done in addition to the application of a surface texture using the multi-texturing procedure from the last lab. Then we can perform the Phong shading calculations for lighting using this varying normal. However, unlike the Phong calculations performed in Lab 10 where all the vectors were defined in world space, we will instead transform everything into tangent space, i.e. such that the normal becomes the z-axis. This is done by computing two additional tangent vectors that become the corresponding x and y axes.
Getting Started
Download CS370_Lab18.zip, saving it into the CS370-Fall2022 directory.
Double-click on CS370_Lab18.zip and extract the contents of the archive into a subdirectory called CS370_Lab18
Open CLion, select CS370-Fall2022 from the main screen (you may need to close any open projects), and open the CMakeLists.txt file in this directory (not the one in the CS370_Lab18 subdirectory). Uncomment the line
add_subdirectory("CS370_Lab18" "CS370_Lab18/bin")
Finally, select Reload changes which should build the project and add it to the dropdown menu at the top of the IDE window.
Solution
Download CS370_Lab18_Solution.zip, saving it into the CS370-Fall2022 directory.
Double-click on CS370_Lab18_Solution.zip and extract the contents of the archive into a subdirectory called CS370_Lab18_Solution
Open CLion, select CS370-Fall2022 from the main screen (you may need to close any open projects), and open the CMakeLists.txt file in this directory (not the one in the CS370_Lab18_Solution subdirectory). Uncomment the line
add_subdirectory("CS370_Lab18_Solution" "CS370_Lab18_Solution/bin")
Finally, select Reload changes which should build the project and add it to the dropdown menu at the top of the IDE window.
Tangent Space
In order to apply bump mapping, we need to tranform the various lighting vectors into tangent space, i.e. the plane that is tangent to the surface with the vertex becoming the origin of the new coordinate system. This transformation makes the surface normal at the vertex the new z-axis (which simplifies the application of the bump map texture). Two additional perpendicular vectors, known as the tangent and bitangent, will then define the tangent plane (i.e. become the x and y axes) - see the following LearnOpenGL - Normal Mapping
Thus we will compute a transformation of basis to map world coordinates to tangent space coordinates as illustrated below
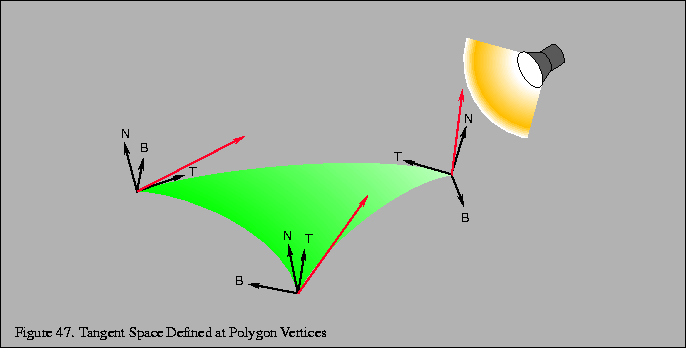
To perform this transformation, we need the three new basis vectors, N, T, and B. Fortunately, we already have the normal (from the model). Since we are using triangles for our primatives, the tangent vector is simply defined as a vector between two of the vertices (which must lie in the plane of the primative). Then we can simply compute the vector cross product to give the bitangent as:
The transformation matrix for the lighting vectors (assuming N, T, and B are unit vectors) is then given by
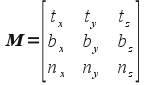
We can then multiply this matrix by the corresponding light vectors (which transforms them to tangent space) via three dot products with T, B, and N for the transformed x, y and z accordingly.
To simplify the process of computing the tangent and bitangent for each vertex in our models, we will be using the tangentspace library function
void computeTangentBasis(vector<vec4> &vertices, vector<vec2> &uvs, vector<vec3> &normals, vector<vec3> &tangents, vector<vec3> &bitangents);
where the vertices, uvs, and normal vectors will be the data loaded from the object models, and tangents and bitangents will be returned by the function.
Tasks
- Add code to load_bump_object() to compute the tangents and bitangents after loading the model using the computeTangentBasis() function.
Note: We have corresponding attribute buffers for the tangent and bitangent vectors that will correspond to additional shader variables in the vertex shader.
- Add code to bumpTex.frag to transform the view vector to tangent space using the dot product with the basis vectors
vec3 TangView = normalize(vec3(dot(Tangent, NormView),dot(BiTangent, NormView),dot(Normal, NormView)));
- Add code to bumpTex.frag to transform the light vector (for each light type) to tangent space using the dot product with the basis vectors
vec3 LightDirection = vec3(dot(Tangent, LightDir),dot(BiTangent, LightDir), dot(Normal, LightDir));
Normal Map
Once we have the view and light vectors transformed to tangent space (which now has a normal given by (0,0,1)) for each fragment of the surface, we can obtain a perturbed tangent space normal per pixel and compute a modified lighting effect to produce self-shadowing. To accomplish this effect, we will store the perturbed surface normals into a normal map which is essentially an “image” of the surface where the geometric variations are stored as colors (again utilizing the correspondence in the pipeline between 3D coordinates and RGB colors). This map is loaded into a texture and applied in addition to the surface texture using multi-texturing in the fragment shader. Since we are only slightly perturbing the direction of the normal, i.e. we primarily maintain the z-axis which is the blue channel, normal maps appear as a mainly blue image. Because we are unable to store negative values in color channels, we instead scale the values such that those between [0,0.5] represent negative values and those between [0.5,1] represent positive values. We can then obtain the original component values via the simple formula
We then compute the Phong model diffuse and specular terms with this perturbed normal and the transformed lighting vectors.
Tasks
- Add code to bumpTex.frag to compute the perturbed normal from the normal map color
vec3 BumpNorm = normalize(2.0f*BumpCol.rgb - 1.0f);
Note: For this lab we are not including a material, so we assume the base material is simply white. However, we could pass materials to the shader and combine a base material with the bump mapping lighting and base texture for added effect.
Combining Texture Colors
The last step to applying bump mapping is to combine the color from the bump map lighting color with the base texture color for the final fragment color.
Typically, since the lighting is an attenuation of the color channels, we will multiply the lighting effect with the base texture.
Tasks
- Add code to bumpTex.frag to multiply the lighting effect with the sampled base texture color
fragColor = vec4(rgb,1.0)*texture(baseMap, texCoord);
Note: If the base texture utilizes the alpha channel (or we include a translucent material), we could also incorporate alpha blending into this effect.
Compiling and running the program
You should be able to build and run the program by selecting bumpMesh from the dropdown menu and clicking the small green arrow towards the right of the top toolbar.
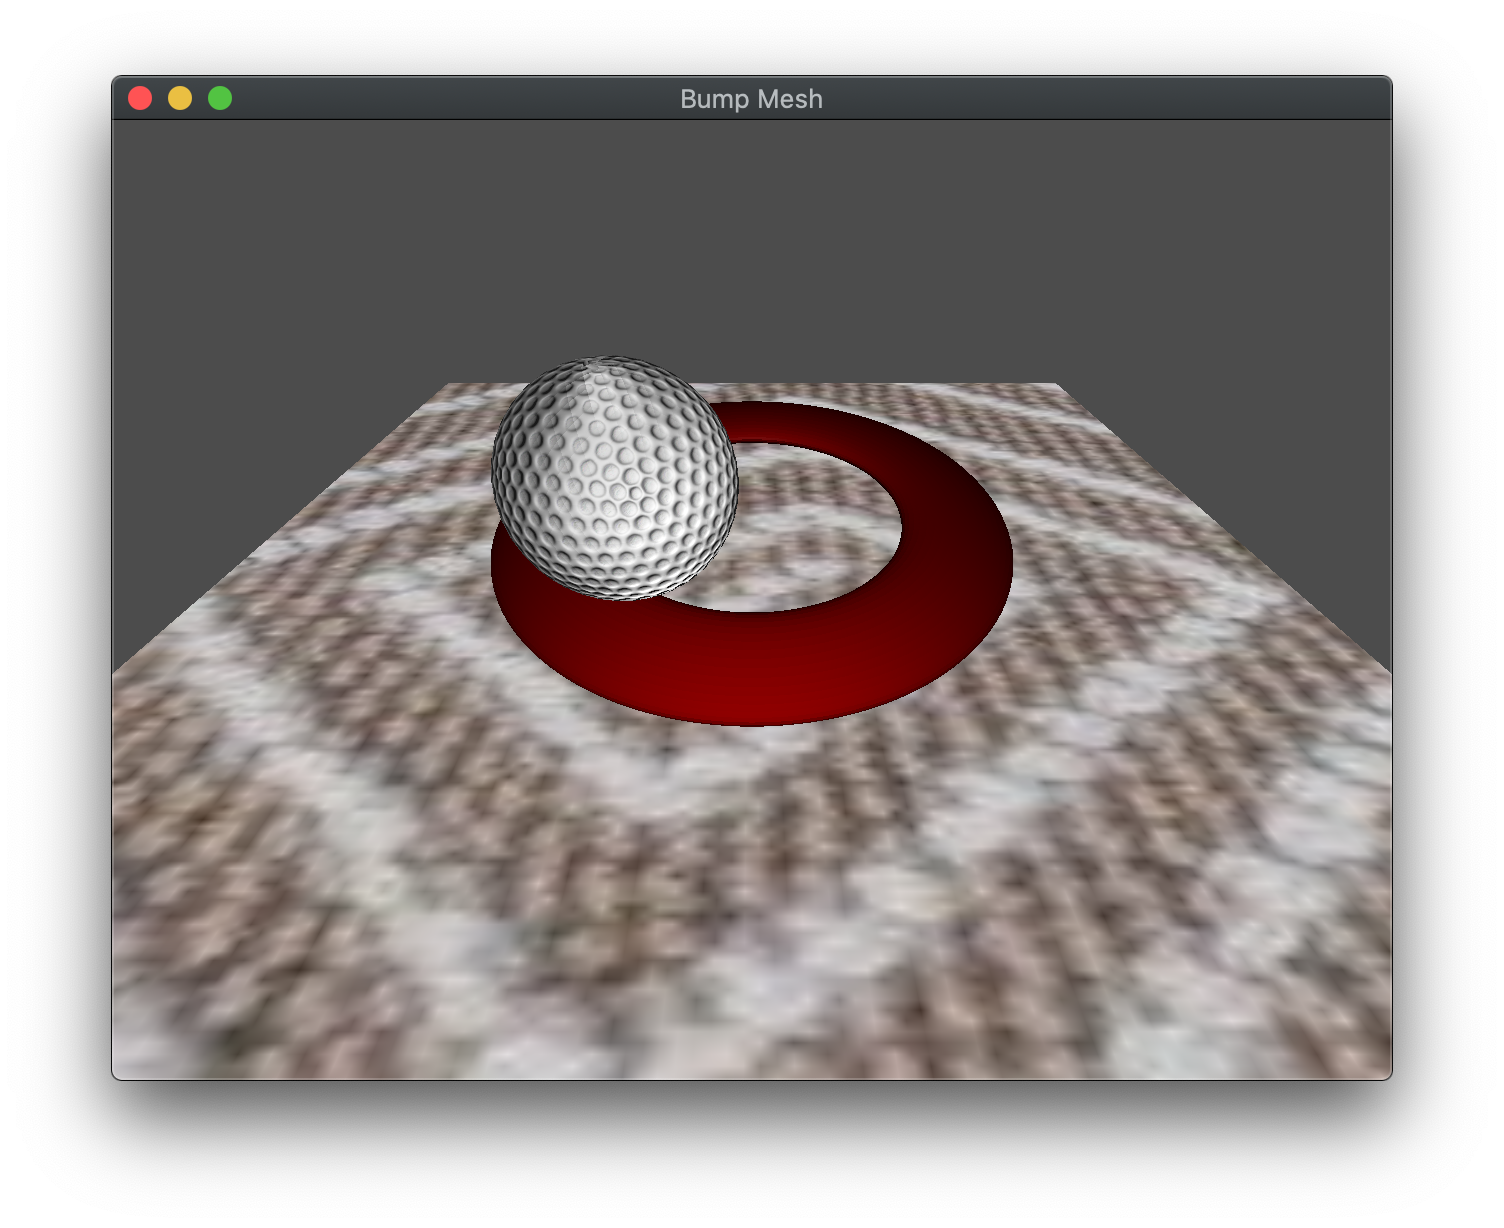
At this point you should see a torus and revolving “golf ball” sphere over a carpet. The spacebar will toggle multi texturing for the carpet, B will toggle bump mapping or simple multi texturing for the golf ball, and G will cycle between different normal maps for the golf ball.
To quit the program simply close the window.
Congratulations, you have now written an application incorporating bump mapping.
