Learning goals
- Use procedural abstraction to avoid repeated code when drawing similar or identical elements
What to do
Part 1: Import the example sketch
Download the following zip file and save it in your Downloads folder: Repetition.zip.
Start a file browser window and navigate to your Downloads folder. Right click on Repetition.zip. Choose Extract All, then choose H:/My Documents/Processing as the destination directory.
In Processing, choose File → Open. In the file chooser dialog, navigate to the H:\My Documents\Processing folder, then double click on Repetition, then choose Repetition.pde. You should now have a Processing window with the source code of the example sketch.
Click the run button, which looks like this:

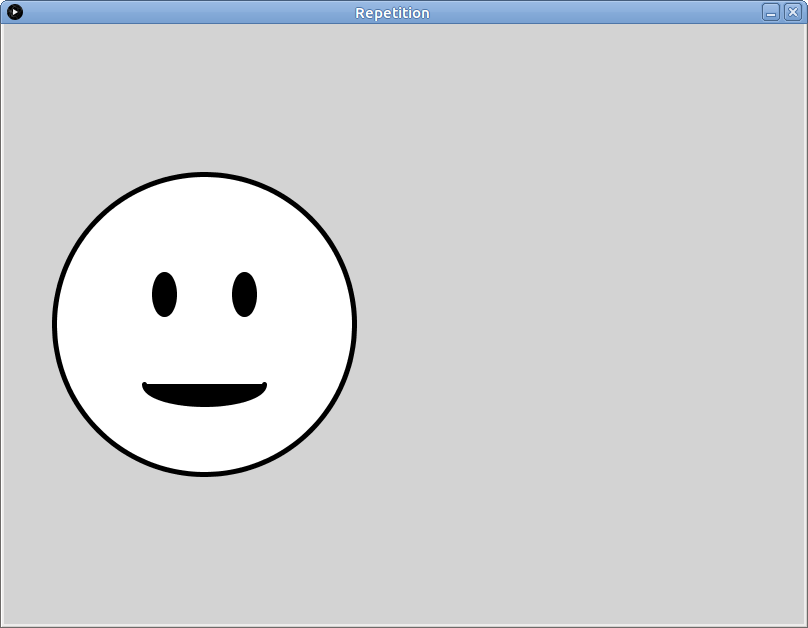
When the sketch runs, you should see the following (click for full size):
Part 2: Repeated elements
This sketch is nice and all, but more smiley faces would be better. How can we add another one?
Let’s say that we want to add another smiley face to the right of the first one. As we know from Lab 1, x-coordinates increase as we go to the right. So, we could just repeat the drawing operations that draw the first face, but increase each x-coordinate by a fixed amount, leaving y-coordinates, width and height, and other drawing values unchanged.
So: add the following code to the draw function, just below the code that draws the first smiley face:
// Draw another smiley face
fill(255);
ellipse(200+400, 300, 300, 300);
fill(0);
ellipse(160+400, 270, 20, 40);
ellipse(240+400, 270, 20, 40);
arc(200+400, 360, 120, 40, 0, PI);
This code is very similar to the code that draws the first smiley face. Note how we can just put +400 after any value to increase it by 400. Processing will do the math for us, which is awesome.
Run the sketch again. What do you see now?
Part 3: Reference point, variables
When we want to draw the same thing in more than one place, the “copy code and tweak it” approach works, but it’s tedious. What if there were a way we could use the same code to draw the same thing in more than one place?
Good news: there is a way! The idea is to do all of our drawing operations relative to a reference point.
For our smiley face, let’s put the reference point right in the center:
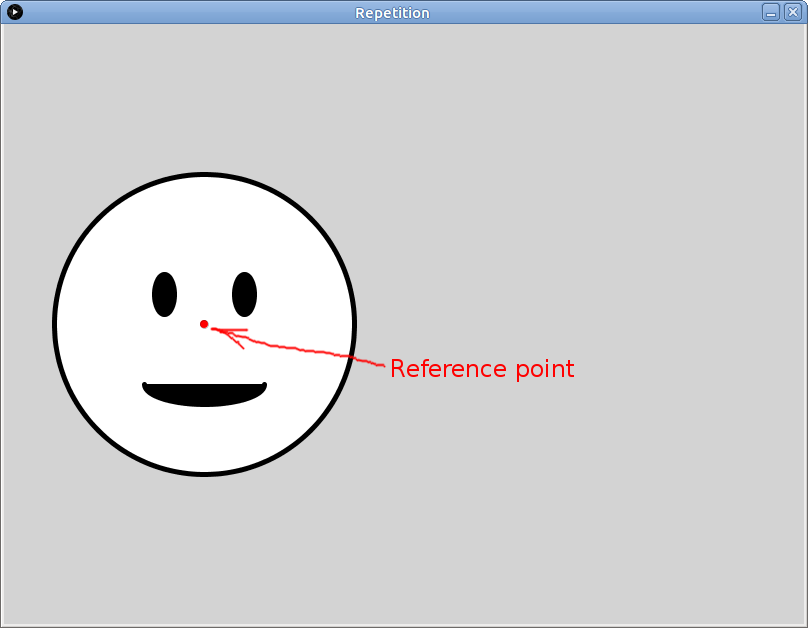
We’ll refer to the x- and y-coordinates of the reference point as smileyX and smileyY. Here is how we can change the code to make all of the drawing operations relative to coordinates of the reference point:
// Draw a smiley face
fill(255);
ellipse(smileyX, smileyY, 300, 300);
fill(0);
ellipse(smileyX-40, smileyY-30, 20, 40);
ellipse(smileyX+40, smileyY-30, 20, 40);
arc(smileyX, smileyY+60, 120, 40, 0, PI);
Let’s break this down.
In the first use of ellipse, which draws the large circle, we specify the center x- and y-coordinates as exactly simleyX and smileyY. This makes sense: the circle’s center is exactly at the reference point.
In the second use of ellipse, which draws the left eye, we want the center x-coordinate to be to the left of (less than) the reference point, and the center y-coordinate to be above (less than) the reference coordinate. The original center was at (160, 270): the x-coordinate is 40 units less than the big circle’s original center x-coordinate (200), and the y-coordinate is 30 units less than the big circle’s original center y-coordinate (300). So, the center x- and y-coordinates of the left eye become smileyX-40 and smileyY-30, respectively. (Just as + means “add” in Processing, - means “subtract.”)
“That’s great,” you say, “but what the heck are smileyX and smileyY? Are they real things?” Heck yeah, they are! Processing allows us to define variables: these are named storage locations where we can store information such as reference point coordinates. All we need to do is define variables called smileyX and smileyY, and set them to the specific coordinates we want to use as the reference point. Here’s the whole shebang:
int smileyX = 200;
int smileyY = 300;

// Draw a smiley face centered at (smileyX, smileyY)
fill(255);
ellipse(smileyX, smileyY, 300, 300);
fill(0);
ellipse(smileyX-40, smileyY-30, 20, 40);
ellipse(smileyX+40, smileyY-30, 20, 40);
arc(smileyX, smileyY+60, 120, 40, 0, PI);
Copy this code into the sketch, replacing the original code to draw the first smiley face. Run the sketch: you should see the first smiley face in its original location. Not very exciting, you say? Well try this: change the values of smileyX and smileyY as follows:
int smileyX = 250;
int smileyY = 370;
Yeah that’s right: the smiley face is now in a different place, and all you had to do was change the values of a couple variables. Take a moment to let this sink in.
Part 4: Using a function!
“Using variables to define a reference point is kind of nifty,” you say, “and I like being able to move the smiley face around so easily by just changing the values of the variables, but I don’t see how that helps me draw multiple copies of the smiley face.” Give yourself a pat on the back! You’re exactly right. It doesn’t, because the code that draws the smiley face only runs one time.
Now…prepare yourself for the most amazing programming technique of all: the function.
A function is a chunk of code that we can execute whenever we want, however many times we want. Functions can have parameters, which are variables whose values can be controlled whenever we use, or call, the function.
Let’s define a function to draw our smiley face. The function will have two parameters, smileyX and smileyY, to control the smiley face’s reference point. Here it is:
// Draw a smiley face centered at (smileyX, smileyY)
void drawSmiley(int smileyX, int smileyY) {
  fill(255);
  ellipse(smileyX, smileyY, 300, 300);
  fill(0);
  ellipse(smileyX-40, smileyY-30, 20, 40);
  ellipse(smileyX+40, smileyY-30, 20, 40);
  arc(smileyX, smileyY+60, 120, 40, 0, PI);
}
You can copy this into your sketch at the bottom of the file, after the closing curly brace (“}”) of the draw function. Note that the code inside the body of the function (between the curly braces, “{” and “}”) is exactly the same as the earlier code we used to draw the smiley face relative to a reference point.
Now, change the draw function so that it looks exactly like this:
void draw() {
  stroke(0);
  strokeWeight(5);

  drawSmiley(200, 300);
  drawSmiley(600, 300);
}
Run the sketch. Yes, that’s two smiley faces! But what just happened, exactly? What happened is that the first call to drawSmiley specified 200, 300 as the values of the smileyX and smileyY parameters, and the second call specified 600, 300 for those values.
Now try changing the draw function to look like this:
void draw() {
  stroke(0);
  strokeWeight(5);

  drawSmiley(180, 180);
  drawSmiley(620, 180);
  drawSmiley(400, 420);
}
That’s right. By calling the drawSmiley function, and specifying the exact reference point coordinates, we can make as many smileys as we want, wherever we want them. Heck yeah.

Just for reference, here’s the complete sketch with the function, just so you can make sure that your version is correct (just click on the link to see the code):
Part 5: Using a function to draw repeated elements in your sketch
Now, it’s time to apply the same technique to your sketch! (I.e., the one you started in Lab 1 and are working on as part of Assignment 2.)
Find a figure in your sketch that you would like to repeat. If you have not done so already, use Processing drawing functions (i.e., ellipse, rect, etc.) to draw one copy of the figure in a fixed location.
Next, change the code to draw the figure so that all of the drawing operations are done relative to a reference point. Introduce variables to store the x- and y-coordinates of the reference point (just like with did with the smiley face above.) Make sure the program still works as before.
Next, introduce a function to draw the figure: the reference point variables will become the parameters of this function. (I.e., make something similar to the drawSmiley function, but have it draw your figure.) Make sure that your sketch’s draw function has exactly one call to your new function. Make sure that when you run the sketch it still works correctly.
Now, try using multiple calls to your function to draw multiple copies of the figure in different locations!
Note that we don’t necessarily expect you to do all of this in class. Please continue to work on this outside of class.
